

Thread
Advice requested - lifted pad during LC III recap
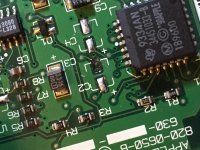
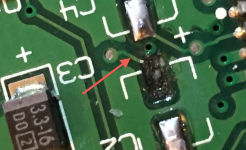
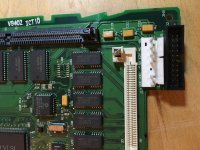
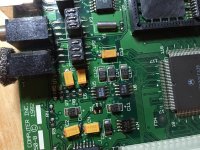
Techknight, you're not wrong! That said, my power supply is a Dyna Comp Inc., which Uniserver and I discussed tend to have a decently long shelf life compared to the TDKs, etc. I'll get to that at some point. When I removed the old caps from the mobo, though, there was a significant amount of gunk.
Scutboy, thanks for the helpful outlook. My 'signature' could use some refinement!!
Scutboy, thanks for the helpful outlook. My 'signature' could use some refinement!!
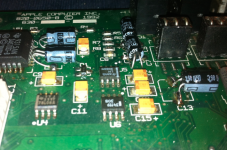
There's certainly a beauty to what's on display there! If those are ceramic caps, they look rather friendly in the positions they've taken. Not a lifted pad in sight and I dare say the soldering is rather clean!!


And regarding that tantalum video: *shudders* - *steps slowly away from Mac LC III* :O

As far as cap jobs are concerned, I have seen worse. MUUUUCH worse. And still work 
Personally for my own stuff, I dont go for Beauty, I go for functionality.
My SE/30 is an example of that, I recapped back in 2001 or so, way before they started really leaking, and I started noticing the audio getting slightly weaker, and weaker.
Personally for my own stuff, I dont go for Beauty, I go for functionality.
My SE/30 is an example of that, I recapped back in 2001 or so, way before they started really leaking, and I started noticing the audio getting slightly weaker, and weaker.
Techknight, those are very reassuring comments. Thanks a lot for that. I'm feeling better about things - I'm also enjoying the speed boost as a result of the overclock I performed at the same time.
I'm also finding out a lot about the functionality of System 7.6.1 that I never knew, because my family went from System 7.1 on a Mac LC straight to 8.5 on an imac.
It sounds like your preventative work paid off. I was quite surprised by the buildup under the old caps when they came off, because the motherboard looked 'clean' unlike my LC 475, which was clearly leaking EVERYWHERE!
I'm also finding out a lot about the functionality of System 7.6.1 that I never knew, because my family went from System 7.1 on a Mac LC straight to 8.5 on an imac.
It sounds like your preventative work paid off. I was quite surprised by the buildup under the old caps when they came off, because the motherboard looked 'clean' unlike my LC 475, which was clearly leaking EVERYWHERE!
In my admittedly limited experience, the best way to tell if a capacitor is on its way out is to remove/replace it if you are uncertain if it is leaking or not.
Often other issues that crop up on the computer are due to the capacitors being faulty and/or affecting other components with their leakage, so that's one way to tell, but the problem isn't always replicated the same way for everybody from what I have observed. An exception might be with the SE and other compacts that get tell-tale issues with the display.
Sadly, this process is really just trial and error, though I suspect if your computer dates from 1994 or earlier, a cap replacement is probably overdue.
Often other issues that crop up on the computer are due to the capacitors being faulty and/or affecting other components with their leakage, so that's one way to tell, but the problem isn't always replicated the same way for everybody from what I have observed. An exception might be with the SE and other compacts that get tell-tale issues with the display.
Sadly, this process is really just trial and error, though I suspect if your computer dates from 1994 or earlier, a cap replacement is probably overdue.
If your 68k vintage mac has not been re-capped. do it... regardless. ( wether it works or not )
We can beat up the topic, but really it doesn't matter... change those caps.
Wether you Do it... or you have a friend do it... or even if you are storing your collection for long term you can
at-least remove the original caps then you know the goo will not leak out and rot things all to heck.
Once that goo leaks out and starts to rot things up, it makes the whole the whole re-cap process way worse.
We can beat up the topic, but really it doesn't matter... change those caps.
Wether you Do it... or you have a friend do it... or even if you are storing your collection for long term you can
at-least remove the original caps then you know the goo will not leak out and rot things all to heck.
Once that goo leaks out and starts to rot things up, it makes the whole the whole re-cap process way worse.
I agree with Uniserver, even the good looking capacitors are starting to leak on our old Macs, i have just recapped this morning a Classic LB, and waiting some caps to finish the job on a Classic II one.
https://68kmla.org/forums/index.php?/topic/24897-testing-20-sc-hard-drives/
BTW how did you lift a pad ? i cut the capacitors (removing the top of the canister) and so far haven't had any trouble.
Bibilit,
The pad did not lift when I was taking capacitors off the board. It lifted when I was cleaning the pads of the remaining solder and applying a new batch. After tinning my iron and adding flux to the pad, I went to apply a new dab of solder, and when I went to remove my iron, the pad just came with it! It was very strange, and very unfortunate!
Regards,
LazarusNine
The pad did not lift when I was taking capacitors off the board. It lifted when I was cleaning the pads of the remaining solder and applying a new batch. After tinning my iron and adding flux to the pad, I went to apply a new dab of solder, and when I went to remove my iron, the pad just came with it! It was very strange, and very unfortunate!
Regards,
LazarusNine
Hello there,
So, the recap performed at the start of this thread never sat well with me. I couldn't stop thinking about those huge tantalum capacitors sitting on top of a poor soldering job. I wasn't happy with my improvised method of stretching out the solder on the cap whose pad I lifted. So, after I handed in my PhD thesis on Tuesday, I decided that the next thing that needed my attention was a re-re-cap. Let me just say a hot air reflow machine makes cap removal so much easier. Also, like Uniserver, I too feel that smaller ceramic caps are sometimes the way to go. I decided to run a trace wire this time rather than rely on a glob of solder to make the connection from the cap to the mobo. Any feedback on the ultimate result would be appreciated. Pleased to announce that the computer runs smoothly and passes its Apple diagnostic tests with flying colours. I'll leave it on all night just to give it time to break itself in.
Regards,
LazarusNine


So, the recap performed at the start of this thread never sat well with me. I couldn't stop thinking about those huge tantalum capacitors sitting on top of a poor soldering job. I wasn't happy with my improvised method of stretching out the solder on the cap whose pad I lifted. So, after I handed in my PhD thesis on Tuesday, I decided that the next thing that needed my attention was a re-re-cap. Let me just say a hot air reflow machine makes cap removal so much easier. Also, like Uniserver, I too feel that smaller ceramic caps are sometimes the way to go. I decided to run a trace wire this time rather than rely on a glob of solder to make the connection from the cap to the mobo. Any feedback on the ultimate result would be appreciated. Pleased to announce that the computer runs smoothly and passes its Apple diagnostic tests with flying colours. I'll leave it on all night just to give it time to break itself in.
Regards,
LazarusNine


Thats one nice cap job
I like the smaller ceramic caps too, they make it much easier to do a nice neat job
My only problem with them is that they get real expensive for the big values, so i tend to use ceramic for the 1uf and 10uf ones and Panasonic 'lytics for the 47uf and 100uf ones
I like the smaller ceramic caps too, they make it much easier to do a nice neat job
My only problem with them is that they get real expensive for the big values, so i tend to use ceramic for the 1uf and 10uf ones and Panasonic 'lytics for the 47uf and 100uf ones