

Thread
Quantum Prodrive possible repair
I have 3 prodrives now that exhibit the spin up, and spin down without any head actuation.
I noticed on all 3 drives when paying close attention, What appears to be tantalum capacitors near teh power jack are actually aluminum electrolytics, and Guess what... They are leaking. everywhere.
So, I know the drives work if you give the actuator head arm a little push on the platter, but they wont do it under its own power.
I may have just found out why.....
I noticed on all 3 drives when paying close attention, What appears to be tantalum capacitors near teh power jack are actually aluminum electrolytics, and Guess what... They are leaking. everywhere.
So, I know the drives work if you give the actuator head arm a little push on the platter, but they wont do it under its own power.
I may have just found out why.....
Hmm, I assume yours are the ProDrive ELS's? (the LPS doesn't suffer from this problem) I just had a look at my ELS, which has this problem...there are two electrolytics near the power jack, but none of them appear to be leaking. Either way I'd be very interested to hear about how you go replacing the caps.
Well I'll be damned. The one quantum pro drive I have doing this has two 22mfd 16v caps near the power header and they are really crusty.
Replaced them with 22mfd, 25v caps and ... nothing. Same.
I have 2 ELSes and 1 LPS and all 3 of them suffer from the same thing.
I havent performed the cap change yet...
I havent performed the cap change yet...
Ya i got around to trying it, no dice here either.... Worth a shot. Here I thought I was onto something. lol.
One of these days, i am going to figure out what the root cause is, once and for all.
One of these days, i am going to figure out what the root cause is, once and for all.
also found out about the caps... mine had a lead that broke off the print... did however not make any difference sadly :C
btw Techknight, thanks for the video about the temporary fix by manually moving the heads! helped me get data off a drive without any issue.
btw Techknight, thanks for the video about the temporary fix by manually moving the heads! helped me get data off a drive without any issue.
I think they're just stiff. Mine was doing the exact same thing-except that sometimes it worked, sometimes it didn't-until I released the heads manually. Then it kept on working for ever more (or would have, had onlyonemac's clumsy finger not scratched the top platter :I :'( ). Anyway, it seems to have freed up in that regard.
Hi,
I have two broken 80 MB Quantum drives (one from an old SE, one from a Color Classic), and both of them exhibit this problem (heads will not move unless manually pushed).
Well, since I had little to lose at this point, I decided to remove the platter. And guess what? There's a little rubber bumper which has gotten all sticky over time, and the heads rest against this stop and get stuck to it.
Unfortunately, I wrecked the heads when I put the platter back, but with care, I don't see why someone couldn't just remove that bumper and at least get a little more use out of the drive.
Anyway, I imagine this has already been mentioned here, but I thought I'd share my experience.
c
I have two broken 80 MB Quantum drives (one from an old SE, one from a Color Classic), and both of them exhibit this problem (heads will not move unless manually pushed).
Well, since I had little to lose at this point, I decided to remove the platter. And guess what? There's a little rubber bumper which has gotten all sticky over time, and the heads rest against this stop and get stuck to it.
Unfortunately, I wrecked the heads when I put the platter back, but with care, I don't see why someone couldn't just remove that bumper and at least get a little more use out of the drive.
Anyway, I imagine this has already been mentioned here, but I thought I'd share my experience.
c
I wonder if this would explain the freezer trick in some cases -- stick it in a freezer and presto, temporary relief from hd failure.
that also proves that the drives are now beyond the point of any viable repair.
The freezer trick can affect all sorts of things. I've encountered IC's and transistors that became temperature sensitive and could be coaxed to behave sometimes by heating or cooling them.
I suspect the rubber bumper is the cause of the Quantum drives sticking. I worked on two Minolta color laser printers that had all sorts of jamming issues. The cause turned out to be sticky rubber bumpers on a number of solenoids buried throughout the printer, it was a nightmare to get to them.
I suspect the rubber bumper is the cause of the Quantum drives sticking. I worked on two Minolta color laser printers that had all sorts of jamming issues. The cause turned out to be sticky rubber bumpers on a number of solenoids buried throughout the printer, it was a nightmare to get to them.
Mine was sticky too! I know which bumper you mean!
Oh GOD no... that reminds me of the light seals in vintage film cameras (my other collecting hobby  )... they tend to turn from foam into some kind of VERY nasty black gunk... one touch with your finger and you ruin the whole seal...
)... they tend to turn from foam into some kind of VERY nasty black gunk... one touch with your finger and you ruin the whole seal...
Having looked again at my drive, that bumper's on the other side to the park position.
Also, the bumper's only there to protect the heads-seldomly would they actually touch it.
Also, the bumper's only there to protect the heads-seldomly would they actually touch it.
Was this a single platter drive? You cannot do this to a multi-platter drive unless you have a removal tool. Because once the 2 platters slip alignment, the servo tracks are no longer good. and the drive will click to death.
Yes, it was. I have since recycled it, because it was basically dead (it wouldn't work at all after I put the platter back in; I probably damaged the heads because it was acting like it couldn't read something).
I didn't know that :O . That's good to know!
May I ask if this removal tool is easily found anywhere? At a reasonable price?
c
While you're at it, you should also ask if a dust-proof room is available at a reasonable price !
!
So I might have found a possible soloution as I have now reapried all three of my broken 80 meg Quantum ELS Prodrives; to fully working condition again. This is by no means a professional repair but more of a jimmy rig which you have to do to fix lol. But I figured I was not taking a loss since they were all busted in the first place.
I watched what it was doing and I am assuming here, but it looks as if the head parks too close to the platters spindle thus, no information is stored this close to the spindle so its doing nothing but spinning up and back down. So I thought up this little rig and its now worked on all three busted HDD's that just spin up and back down again.
I exposed the part of the drive I was working on only, and started by removing the top magnet motor housing covering the arm's coil. First remove the nut in the top middle; then the two philips screws holding the plate on.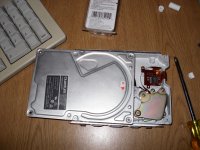
Then I removed the top motor magnet plate using the precission set flat blade, and a pliers in the middle once lifted. Carefully lift with pliers and make sure not to hook the plate up on the middle nut threads.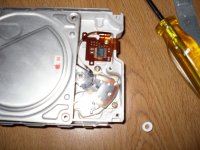
I then had some un-used disposable foam air stones for a fish tank that were already round in shape, and about the right size to fit in the housing structure. I cut the foam air stone with a blade to what I thought looked like the right height, making sure I left it a bit longer so the pressure of the top plate screwed down will hold it in place. This gives me the foam ring I need to make this HDD work again. Making it too small will cause the foam ring to move around and possiably moving out onto the platter thus, trashing your HDD, so make sure you cut it longer in length. I then placed the foam ring in the lower right side of the arm's motor structure.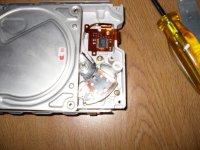
Then put the top magnet plate back on and screwed the philips in first, and finger tighten the nut.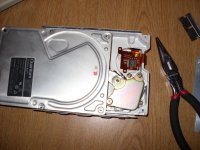
Now, I took the small flat blade screw driver and wedged it between the top and bottom plate carefully and pressed in on the foam ring turning it into more of a "U" shape. Do the same on the opposite side pressing in gently on the foam ring. Dont break the ring by pressing too hard.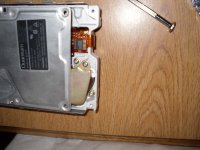
Now your ready to test the drive out. Hook it up and fire it up. Listen for it to spin up and start booting. If it does, turn off the machine, wait for it to spin down and do it again just to test. If you hear any weird noises turn it off immediatly. I had this happen to me the first time and it was because I did not press the foam ring into a U good enough. Most likley that is your issue if it makes weird noises. If the drive stays spun up you just fixed your Quantum Prodrive ELS. THese HDD's are pretty robust, seem they can take alot lol. All three of mine worked as if they were never broken. None even needed to be re loaded or re formated. They all are working just as good as they were when last working.
Hope this helps someone else.
Nick.
I watched what it was doing and I am assuming here, but it looks as if the head parks too close to the platters spindle thus, no information is stored this close to the spindle so its doing nothing but spinning up and back down. So I thought up this little rig and its now worked on all three busted HDD's that just spin up and back down again.
I exposed the part of the drive I was working on only, and started by removing the top magnet motor housing covering the arm's coil. First remove the nut in the top middle; then the two philips screws holding the plate on.
Then I removed the top motor magnet plate using the precission set flat blade, and a pliers in the middle once lifted. Carefully lift with pliers and make sure not to hook the plate up on the middle nut threads.
I then had some un-used disposable foam air stones for a fish tank that were already round in shape, and about the right size to fit in the housing structure. I cut the foam air stone with a blade to what I thought looked like the right height, making sure I left it a bit longer so the pressure of the top plate screwed down will hold it in place. This gives me the foam ring I need to make this HDD work again. Making it too small will cause the foam ring to move around and possiably moving out onto the platter thus, trashing your HDD, so make sure you cut it longer in length. I then placed the foam ring in the lower right side of the arm's motor structure.
Then put the top magnet plate back on and screwed the philips in first, and finger tighten the nut.
Now, I took the small flat blade screw driver and wedged it between the top and bottom plate carefully and pressed in on the foam ring turning it into more of a "U" shape. Do the same on the opposite side pressing in gently on the foam ring. Dont break the ring by pressing too hard.
Now your ready to test the drive out. Hook it up and fire it up. Listen for it to spin up and start booting. If it does, turn off the machine, wait for it to spin down and do it again just to test. If you hear any weird noises turn it off immediatly. I had this happen to me the first time and it was because I did not press the foam ring into a U good enough. Most likley that is your issue if it makes weird noises. If the drive stays spun up you just fixed your Quantum Prodrive ELS. THese HDD's are pretty robust, seem they can take alot lol. All three of mine worked as if they were never broken. None even needed to be re loaded or re formated. They all are working just as good as they were when last working.
Hope this helps someone else.
Nick.
Just keep in mind all the foam is doing is preventing the head to return all the way back into the home position, where its getting "stuck" on the deteriorated rubber stopper. The actuator stiction is the reason why the drive never operates and spins back down. the voice coil servo cant overcome the force against the stuck actuator.
This is a very promising "quick fix" though.
If I had any of these left, I'd give it a try (I got what I could off of them, formatted them, and recycled them).
If I come across any more (which I'm bound to do), I'll give this a try.
c
If I had any of these left, I'd give it a try (I got what I could off of them, formatted them, and recycled them).
If I come across any more (which I'm bound to do), I'll give this a try.
c
Yes...this repair is rather quick, can be done in 5 mins or less. Its super easy too.
Right, it is just preventing it from returning to home position, though it seems to be working out so far.
However, on my drives the bumper was on the other side of where I was putting the foam at. Yes, on one drive; after I removed the top plate I saw a black streem of goo on the bottom magnets. But with the removal of the top plate, the rubber bumper and whole stalk or whatever its around comes with it. You can easily clean it off with a towel or such. I used the same towel to wipe the remaining goo off the stalk. Then replaced it with one of the foam rings but, I had to shave its sides down a tad.
This was also easy as the ring just slipped over the lip and fit into place. I'd love to hear if anyone else gives this a go and hear their out come, also gladly will help.
Right, it is just preventing it from returning to home position, though it seems to be working out so far.
However, on my drives the bumper was on the other side of where I was putting the foam at. Yes, on one drive; after I removed the top plate I saw a black streem of goo on the bottom magnets. But with the removal of the top plate, the rubber bumper and whole stalk or whatever its around comes with it. You can easily clean it off with a towel or such. I used the same towel to wipe the remaining goo off the stalk. Then replaced it with one of the foam rings but, I had to shave its sides down a tad.
This was also easy as the ring just slipped over the lip and fit into place. I'd love to hear if anyone else gives this a go and hear their out come, also gladly will help.
yea, once that rubber is gone these drives should be fixed for good.
If you have to remove the actuator head stack assembly, you have to rig up a piece of paper, or straw/toothpick and slide it in between the head supports while moving them off the platter, because if the heads slap together when coming off the platter, they are ruined for good.
If you have to remove the actuator head stack assembly, you have to rig up a piece of paper, or straw/toothpick and slide it in between the head supports while moving them off the platter, because if the heads slap together when coming off the platter, they are ruined for good.
I'd try this, but the last time I attempted to open mine, I may have screwed the screws for good...
Well when I said fixed for good, I didnt mean it in THAT sense... LOL
I pulled my Prodrive LPS 40meg apart that went into the classic.
the rubber bumpers sit on the magnet posts that the screws go through. I had to remove the head actuator assembly to get at it, as its in a really tight spot. lol, I cleaned out the old rubber little by little and still couldnt get it all. Maybe some acetone I could.
after that, I stuck some plastic foam in there and presto. works like a brand new drive.
the rubber bumpers sit on the magnet posts that the screws go through. I had to remove the head actuator assembly to get at it, as its in a really tight spot. lol, I cleaned out the old rubber little by little and still couldnt get it all. Maybe some acetone I could.
after that, I stuck some plastic foam in there and presto. works like a brand new drive.
I took a 80MB Prodrive ELS apart, and its rubber crash stopper is on the bottom under the platter.
So, I removed the head actuator assembly, Since it was a single platter drive it made things much easier. Removed the platter, etc.. carefully.
Took some goo gone and got rid of all that rubber. Used various layers of heatsrink to replace it. Its a bit harder, but its better than nothing at all. Re-assembled and to my surprise, the drive worked perfectly.
now THAT was nuts. I never rebuilt a drive down to that degree before. I will have to do a video on my next drive. i have 1 more ELS 80mb left which should be the same as well.
So, I removed the head actuator assembly, Since it was a single platter drive it made things much easier. Removed the platter, etc.. carefully.
Took some goo gone and got rid of all that rubber. Used various layers of heatsrink to replace it. Its a bit harder, but its better than nothing at all. Re-assembled and to my surprise, the drive worked perfectly.
now THAT was nuts. I never rebuilt a drive down to that degree before. I will have to do a video on my next drive. i have 1 more ELS 80mb left which should be the same as well.
how about foam first then heat shrink over that?
yea i could do that. But i didnt want to use foam because it doesnt hold together that well. You have to think of the air berring currents inside the unit as well as the actuator bouncing off of it. Ill figure something out.
it was just a milestone to be able to remove the actuator, the magnets, AND the platter, and reassemble it and keep it working again. LOL
the problem was, I used a tissue to wrap the platter in so it dont get dirty/messed up while I worked on the drive. that was a bad idea because alot of little fibers got onto the platter. yuck. It still worked, but i dunno for how long. lol.
it was just a milestone to be able to remove the actuator, the magnets, AND the platter, and reassemble it and keep it working again. LOL
the problem was, I used a tissue to wrap the platter in so it dont get dirty/messed up while I worked on the drive. that was a bad idea because alot of little fibers got onto the platter. yuck. It still worked, but i dunno for how long. lol.
probably work fine for a long time