

Thread
Macintosh LC III Maxell Battery damage - fixable?

Sorry for bad photos. LC III was in storage for about 15 years, and yes it had the darned Maxell battery installed, which went bad and sprayed all the toxic guts out some time ago.The corrosion was even worse, but I managed to clean it about 70% off the board. The case is also corroded, but nothing serious. Still the brown stuff remains (it won't go off easily) and some traces are eaten off.
Is the board fixable? What do you think?
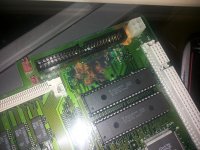
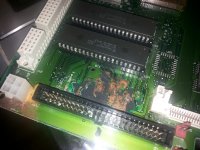
Is the board fixable? What do you think?
hey there sorry , but there is no saving that one.
however though, the LC-III happens to be one of my favorites Mac's
and i have a little collection of LCIII parts.
however though, the LC-III happens to be one of my favorites Mac's
and i have a little collection of LCIII parts.
That thing is toast. the entire copper plane is gone from the acid. Only thing left is the fiberglass/fenolic.
Is it not possible/worth it to solder wire jumpers?
Nope. Dont know what is all broke. You would need to run alot of wires.
lol i guess there is always the labor of love... you could always get the schematics, and maybe about 16 to 20 hours... and just run wires from a 2 b.
i mean if it was the last one in the world... and you were on an island.. and you needed it to bounce some communication to the outside world... Techkinght would be your guy.
that thought reminds me of lost.
i mean if it was the last one in the world... and you were on an island.. and you needed it to bounce some communication to the outside world...
Techkinght would be your guy.that thought reminds me of lost.
Its fixable. Anything is. It depends on how much one is willing to throw in there. From what I can see, part of your ROM and much of your Internal SCSI port is affected here.
But if you do, it will be an act of love if you would do this. And here's how!
1 - You need to get a Butt Naked LC III Board and copy that area into a high resolution silk screening mesh.
Go into Photoshop and touch up a few things here and there before burning the mesh. Make it as a perfect square of the area as possible that it touches the traces around it.
2 - grind off a slightly smaller square area of the board and make it clean. De-populate the board off chips, caps and components Clean off the paint off the remaining traces and expose the metal under it.
3 - line up the LC III board to the silk screen and try it a few times, lifting it and putting it on the board to see if it remains in place and lined up perfectly. Secure the board down when you have it right.
4 - line up silk screen to the board and secure it.
5 - silk screen some conductive paint onto the board, give about 2 to 3 layers.
6 - remove silk screen and inspect work. If done perfect, allow conductive paint to cure, about 24 hours. If not, strip it off while its still wet with some strong paint thinners. Realign silk screen and repeat 3 - 6 if done wrong.
7 - put components back on the board. If its a good conductive paint, you should be able to solder on it. If not, there is a thing called "Cold Solder" which you can paint the parts back on and let it dry.
If all is done well, you have restored an LC III board.
Ad that's minor compared to what people do out there. People have been known to take this:

And turn it into this:

But if you do, it will be an act of love if you would do this. And here's how!
1 - You need to get a Butt Naked LC III Board and copy that area into a high resolution silk screening mesh.
Go into Photoshop and touch up a few things here and there before burning the mesh. Make it as a perfect square of the area as possible that it touches the traces around it.
2 - grind off a slightly smaller square area of the board and make it clean. De-populate the board off chips, caps and components Clean off the paint off the remaining traces and expose the metal under it.
3 - line up the LC III board to the silk screen and try it a few times, lifting it and putting it on the board to see if it remains in place and lined up perfectly. Secure the board down when you have it right.
4 - line up silk screen to the board and secure it.
5 - silk screen some conductive paint onto the board, give about 2 to 3 layers.
6 - remove silk screen and inspect work. If done perfect, allow conductive paint to cure, about 24 hours. If not, strip it off while its still wet with some strong paint thinners. Realign silk screen and repeat 3 - 6 if done wrong.
7 - put components back on the board. If its a good conductive paint, you should be able to solder on it. If not, there is a thing called "Cold Solder" which you can paint the parts back on and let it dry.
If all is done well, you have restored an LC III board.
Ad that's minor compared to what people do out there. People have been known to take this:
And turn it into this:
tooooooooooo much work.
Scrap it. You can find another board and replace it easier than it would be to put all that elbow grease into it.
Now granted ive repaired some things that were pretty bad off. but not THAT bad.
Scrap it. You can find another board and replace it easier than it would be to put all that elbow grease into it.
Now granted ive repaired some things that were pretty bad off. but not THAT bad.
yeah i have this image of techkinght breaking it in half LOL ok its fixed ……..
Actually its not that hard, it is like silkscreening a board to etch it but in reverse with conductive paint instead of etching protector. I've done this before with the good doctor for the Big Apple Group for one of his Apple II ROM Boards he created. Not that I expected to make buku amounts of money with it, but it was fun doing it.
But as we know, all Mac Boards are multi-layered and this would only restore the top layer. Who knows what condition the other layers are in.
But as we know, all Mac Boards are multi-layered and this would only restore the top layer. Who knows what condition the other layers are in.
Edit: Nevermind, answered my own question.