

RAM:
The 9600 support up to 768mb of ram officially but it’s possible to install up to 1.5GB in the TWELVE slots that are on your board. Each slot will take up to a maximum of a 128mb stick. As mentioned earlier, these machines are used more for specialty purposes so it’s overkill to install more than the official maximum amount, 768mb.
There are two types of RAM sticks for the 9600: FPM (Fast-Paged Mode) 70ns DIMMs, and EDO (Extended Data Out) 60ns DIMMs. Go for the latter - the 60ns EDO DIMMs, for obvious reasons. Both types of sticks are 5v, 64bit 168pin DIMMs, and the EDO variety is still available from OWC (Other World Computing). The motherboard also supports RAM interleaving which results in a 5%-15% increase in system performance. However you MUST install the sticks in a certain order to take advantage of this:
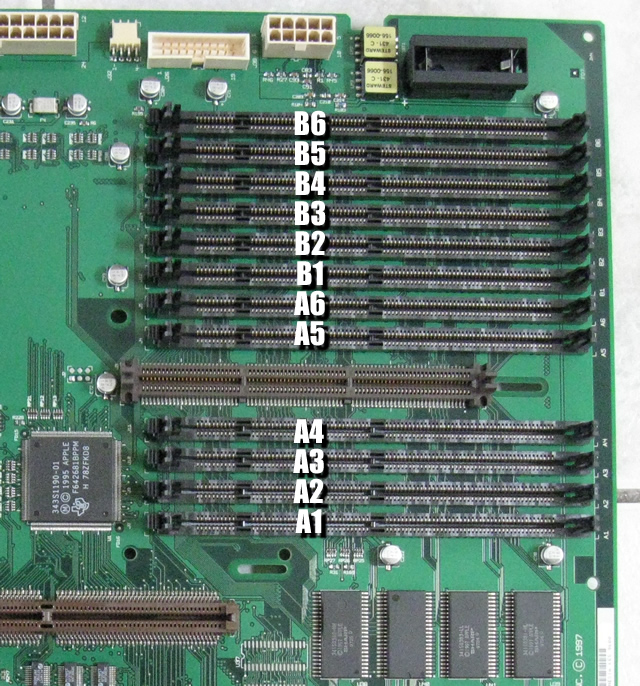
First install a stick into the A6 slot, then into the B6 slot. Then into the A5 slot, then into the B5 slot and so on. When installing you’ll begin to have a gap in between the sticks, which seems kind of weird, but that’s what it takes to get these interleaved correctly. We start with a number first (6 in this case), then we fill up A and B, then move down to the next number (5) and repeat — A then B in a descending way.
You may wonder why we’re starting with the number 6 first rather than the number 1. The truth is that the techs at Apple have contradicted themselves as to what we should start with first. People have more often found success when starting with the higher-numbered slots first, but testing has shown that interleaving was successful in both scenarios. You’ll be fine regardless of your starting point, but I recommend populating A6-B6, then A5-B5 and so on in a descending order since more people have recommended it that way than the other way around.
NOTE:
When booting up, System 7 performs an automatic RAM test and there is no way to disable it like in OS8 or OS9 (by holding Command + Option when opening the Memory control panel). According to my calculations, with 768MB of ram installed, you’ll have to wait approximately 1 minute 25 seconds until you finally see the System 7 screen come on your monitor. Each 128MB stick of RAM adds about 15 seconds of check time to the startup. Here’s what I got when I tested this:
128mb - 0:10
256mb - 0:25
384mb - 0:40
512mb - 0:55
640mb - 1:10
768mb - 1:25
When you turn your system on and you get nothing but a blank screen, don’t worry. It takes time…
The 9600 support up to 768mb of ram officially but it’s possible to install up to 1.5GB in the TWELVE slots that are on your board. Each slot will take up to a maximum of a 128mb stick. As mentioned earlier, these machines are used more for specialty purposes so it’s overkill to install more than the official maximum amount, 768mb.
There are two types of RAM sticks for the 9600: FPM (Fast-Paged Mode) 70ns DIMMs, and EDO (Extended Data Out) 60ns DIMMs. Go for the latter - the 60ns EDO DIMMs, for obvious reasons. Both types of sticks are 5v, 64bit 168pin DIMMs, and the EDO variety is still available from OWC (Other World Computing). The motherboard also supports RAM interleaving which results in a 5%-15% increase in system performance. However you MUST install the sticks in a certain order to take advantage of this:
First install a stick into the A6 slot, then into the B6 slot. Then into the A5 slot, then into the B5 slot and so on. When installing you’ll begin to have a gap in between the sticks, which seems kind of weird, but that’s what it takes to get these interleaved correctly. We start with a number first (6 in this case), then we fill up A and B, then move down to the next number (5) and repeat — A then B in a descending way.
You may wonder why we’re starting with the number 6 first rather than the number 1. The truth is that the techs at Apple have contradicted themselves as to what we should start with first. People have more often found success when starting with the higher-numbered slots first, but testing has shown that interleaving was successful in both scenarios. You’ll be fine regardless of your starting point, but I recommend populating A6-B6, then A5-B5 and so on in a descending order since more people have recommended it that way than the other way around.
NOTE:
When booting up, System 7 performs an automatic RAM test and there is no way to disable it like in OS8 or OS9 (by holding Command + Option when opening the Memory control panel). According to my calculations, with 768MB of ram installed, you’ll have to wait approximately 1 minute 25 seconds until you finally see the System 7 screen come on your monitor. Each 128MB stick of RAM adds about 15 seconds of check time to the startup. Here’s what I got when I tested this:
128mb - 0:10
256mb - 0:25
384mb - 0:40
512mb - 0:55
640mb - 1:10
768mb - 1:25
When you turn your system on and you get nothing but a blank screen, don’t worry. It takes time…