

Thread
Homebrew PRAM Batteries
Yep, makeshift computing. When I first got my LC I immediately assumed buying such a custom battery would be impossible, so I set out to make one.
Parts:
3xAAA Battery holder from LED flashlight.
3xAAA batteries. I used alkaline.
Connector and Leads from the old battery
Electrical tape
And this is how it is now:
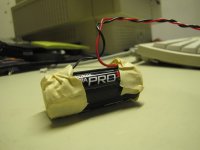
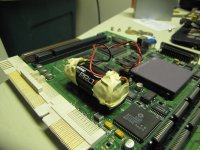
Parts:
3xAAA Battery holder from LED flashlight.
3xAAA batteries. I used alkaline.
Connector and Leads from the old battery
Electrical tape
And this is how it is now:
Heh, I just came here to see if anyone had done something similar. I just stumbled across a Japanese page where the guy had done something similar for his 6300. My 5400 had a dead battery when I got it so I bought one from ebay to replace it. Then I left it idle for too long and that one also died. So it's been left dead ever since. I never thought about using 3xAAAs as a replacement.
BTW I was told some time ago that it's possible to remove cells from a 9v battery to make it into a 4.5v. I just did a quick google, and found this.
BTW I was told some time ago that it's possible to remove cells from a 9v battery to make it into a 4.5v. I just did a quick google, and found this.
I've been trying to find a triple-AAA holder that doesn't have the batteries all side-by-side. One on top and two below is what I'd prefer. But no luck in finding one. Maybe picking up a cheap LED flashlight and pulling out the battery carriage is the best option. Though I'd prefer to have both wires connected to the one end like a regular holder.
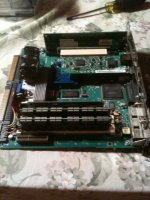
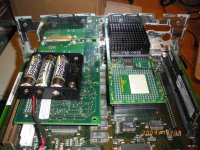
Radio Shack sells battery holders which take four batteries. All you need to do is solder a wire across the space of one of the batteries. I've done this on two different motherboards:
View attachment 15855
View attachment 15855
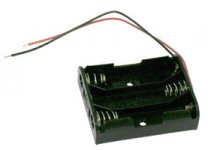
Yep I think one of those flat triple holders might be better in the long run. The only thing is their footprint might be a bit big. I'll have to have a closer look inside my 5400.
At least with these you can replace the batteries without having to lift the holder (assuming you've velcro-ed it down). And there's also no danger of batteries slipping out if the plastic weakens. You can also get enclosed box holders (even some with on/off switches).
At least with these you can replace the batteries without having to lift the holder (assuming you've velcro-ed it down). And there's also no danger of batteries slipping out if the plastic weakens. You can also get enclosed box holders (even some with on/off switches).
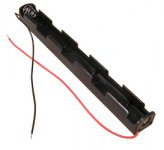
all the pram batteries are removed from my computers
(no battery = no leak)
i have to many computers to put a pram battery in each of them
for the fiew who need a battery to start up (macintosh II, IIx, IIfx, ..) and the ones with a bad accessible pram battery location (IIci, IIcx, ..)
i use a (or two) mono mini jack (female) at the back of the computer - hole drilled in and attached to a replacable clamp (never in the case of the computer)
and a male mono mini jack at a battery holder (different color of the mini jack for different voltage)
so i can attach effortless the 'removable pram battery' for the time needed or wished
(no battery = no leak)
i have to many computers to put a pram battery in each of them
for the fiew who need a battery to start up (macintosh II, IIx, IIfx, ..) and the ones with a bad accessible pram battery location (IIci, IIcx, ..)
i use a (or two) mono mini jack (female) at the back of the computer - hole drilled in and attached to a replacable clamp (never in the case of the computer)
and a male mono mini jack at a battery holder (different color of the mini jack for different voltage)
so i can attach effortless the 'removable pram battery' for the time needed or wished
Consider to use the software "Clock Adjust", a small programme residing in the Control Panels folder. The software permits to set a drift to compensate for. Each time the computer boots, the programme calculates the deviation caused from the clock drift since the last boot process. The programme sets the clock to the correct time and terminates itself.
Another alternative I've seen online is to use three "button" batteries. Much smaller footprint than the AAA or AAAA batteries.
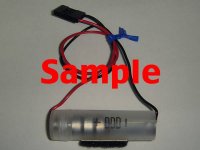
Not sure if the holders are on ebay. I found these on Yahoo Auctions in Japan. Might be a bit more expensive but tidier.
Not sure if the holders are on ebay. I found these on Yahoo Auctions in Japan. Might be a bit more expensive but tidier.
i like the 3 button battery idea better.
This is my opinion, but i really really really really really would NOT install the batteries on top the motherboard. if one of them goes, there goes your board. I would use an extended wire, and find somewhere else inside the mac to stick em, encase them or something.
This is my opinion, but i really really really really really would NOT install the batteries on top the motherboard. if one of them goes, there goes your board. I would use an extended wire, and find somewhere else inside the mac to stick em, encase them or something.
Because the clock uses a crystal, and crystals resonate based on their physical dimensions/properties, it won't slow down with low voltage. With low enough voltage, there is a point where a crystal stops resonating properly (too weak, just stops, or oscillates weird), but that causes the time to be off wildly.
So a low voltage battery shouldn't slow down your clock and a high voltage battery shouldn't speed it up.
well, thats because crystal oscillators drift as well. Thats why rock stable oscillators require a crystal-oven based oscillator, and the most accurate oscillator is a temperature controlled laser pumped rubidium crystal based setup, like what is on board a satellite.
This is why the advent of PLL has came along, to account for this in radio circuits, etc... But regular crystals jitter and drift during operation, and regular cheap old crystals are only accurate to roughly 100ppm.
This is why the advent of PLL has came along, to account for this in radio circuits, etc... But regular crystals jitter and drift during operation, and regular cheap old crystals are only accurate to roughly 100ppm.
Good point. One should consider to keep the battery on the outside of any machine that is not frequently cared for. Even recent battery makes have a tendency to leak when discharged (nasty corrosive stuff comes out). Simply attach the external battery connector or battery holder to the back panel of the computer (adhesive tape might do). For one machine I cut a piece of plastic into the size of the original PRAM battery and attched a wire to each end, so it serves as a plug to contact the battery holder without a change to the mainboard. In many cases you do not need to drill holes or apply any permanent changes at all.
Alternatively you could mount the battery pack into a plastic container that keeps the goo of some leaking batteries safely in place while leaving the outside appearance of your computer untouched.
I once put a voltage regulator (built on a mini breadboard) in my mac. I powered it from a 9V PP3. It was terrible with bits of prestick and sticky tape amid wires running from end to end across the top of the hard drive :O ! But before that, it was worse. I had a small phone charger-style transformer and I used that to power the regulator and had to leave the case of the mac off 8-o !
How about using onlyonemac's suggestion and to combine the voltage regulator with the computers own PSU: tap some Volts through the voltage regulator to power the clock chip and add a delay circuit to power up the mainboard only a second later. Get the correct time from a time server and run an AppleScript programme to restore other PRAM based setting. In case of the P475 there are also instructions for an electronic circuit available to provide a soft power on (using the keyboard power button).
Getting back to the pics in the OP, I love the idea, but the holder appears to be overkill to this jackleg mechanic, engineer wannabe. [ ] ]'>
] ]'>
Suggestion for review & feedback:
00) Start with three inexpensive plain old alkaline batteries, IIRC, these have a longer shelf life and longer low current duty cycle than the expensive pink bunny variety . . .
01) use electrical tape to bind them together in the same config . . .
02) use electrical tape to "pressure wrap" the short inter-battery connections and long, color coded, leads in place . . . test . . .
03) wrap leads around pack for strain relief and secure with electrical tape so that the (twisted pair) leads project straight up from the side of the "top" battery as illustrated above . . . test . . .
04) wrap entire assembly in electrical tape to simplify the convoluted shape, maximizing volume/minimizing overall surface area . . .
05) do final testing . . .
06) hold the assembly by the leads and dip it into a can of "liquid rubber" tool grip or "liquid rubber" wire insulation to a depth of about an inch or so up the leads . . .
. . . either insulation material should be readily available at your local home improvement store, but the tool grip comes in pretty colors . . . [ )] ]'>
07) crimp connect the assembly leads to the connector's leads . . .
08) secure assembly however and wherever you choose with the leads (the assembly's Achilles' heel in terms of leakage) pointing straight up.
Doing it this way is probably the least expensive way to do "leak-proof" insulated container battery packs for entire collections. Varying the battery combinations to suit each voltage requirement would be necessary, of course. The packs would be disposable, about as eco-friendly as I can imagine. Just cut 'em open to harvest the wires for re-cycling into another pack at the end of the alkaline cell's useful life.
No lead-free or any other kind of solder or soldering required!
If one of the cells fail/leak/burst/whatever, the elastic properties and the spare volume inherent in the "containment" design should come into play and save the day.
Whatcha think? :?:
] ]'>Suggestion for review & feedback:
00) Start with three inexpensive plain old alkaline batteries, IIRC, these have a longer shelf life and longer low current duty cycle than the expensive pink bunny variety . . .
01) use electrical tape to bind them together in the same config . . .
02) use electrical tape to "pressure wrap" the short inter-battery connections and long, color coded, leads in place . . . test . . .
03) wrap leads around pack for strain relief and secure with electrical tape so that the (twisted pair) leads project straight up from the side of the "top" battery as illustrated above . . . test . . .
04) wrap entire assembly in electrical tape to simplify the convoluted shape, maximizing volume/minimizing overall surface area . . .
05) do final testing . . .
06) hold the assembly by the leads and dip it into a can of "liquid rubber" tool grip or "liquid rubber" wire insulation to a depth of about an inch or so up the leads . . .
. . . either insulation material should be readily available at your local home improvement store, but the tool grip comes in pretty colors . . . [
)] ]'>07) crimp connect the assembly leads to the connector's leads . . .
08) secure assembly however and wherever you choose with the leads (the assembly's Achilles' heel in terms of leakage) pointing straight up.
Doing it this way is probably the least expensive way to do "leak-proof" insulated container battery packs for entire collections. Varying the battery combinations to suit each voltage requirement would be necessary, of course. The packs would be disposable, about as eco-friendly as I can imagine. Just cut 'em open to harvest the wires for re-cycling into another pack at the end of the alkaline cell's useful life.
No lead-free or any other kind of solder or soldering required!
If one of the cells fail/leak/burst/whatever, the elastic properties and the spare volume inherent in the "containment" design should come into play and save the day.
Whatcha think? :?:
For a leak proof assembly there needs to be a vent that allows gas from the battery to escape (avoid building up pressure in a sealed container), there needs to be some space or a getter inside the container to collect any liquid that may come out of the battery (probably a piece of toilet paper), and also it must be approved that the container is resistant to the ugly battery goo stuff, eating it's way towards precious electronics. Some polypropylene canister or bottle combined with the help of gravity could do, as long as the mounting position is chosen appropriately and the machine is stored in according position.
I know I wasn't asking for help but thanks for it anyway
. I had thought of hacking the computer's PSU, but I knew that the battery voltage had to be present before the main power could be applied. I didn't think of adding a delay to the main supply. You were thinking of a relay?Having said that, however, I am now thinking of getting a proper PRAM battery :-/ , but good luck with your mac anyway.
That's easy enough to do with my design, just add a piece of wire insulation from which the wire has been pulled into the twisted, color coded pair of leads.
Make it long enough and it could act as a drain to the outside of the case. ;D
No problem add the toilet paper pad underneath the two battery base during the initial binding wrap of of the the three cells. There's provision for plenty of extra space in between the batteries in the pack which is reserved by wrapping the assembly in order to minimize the surface area and simplify the topology of the pack.
Heck, wrap it enough times with electrical tape and you might be able to skip the tool dip altogether.
"Rubberized" tool grip liquid is both acid and oil resistant besides being non-conductive and fairly elastic. I'm sure the properties/makeup of the material is easily researched. Corrosion prevention shrouds for lead-acid battery terminals in cars appear to be made of the same or similar liquid -> solid phase change materials. The ones I've seen haven't appeared to be made by a casting process, but I'll take a closer look.
Dunno about the acid or oil resistance of liquid wire insulation, the purpose of that material is waterproofing spliced connections in outdoor, underground or interior wet space applications where shrink wrap isn't sufficient or won't work at all.
PRAM batteries or packs should be removed for long term storage to begin with, they should at the very least be disconnected for medium term storage to preserve the charge anyway, so they may as well be removed entirely as well.
Barring catastrophic failure, any Homebrew PRAM Battery Pack will have ceased doing its job and should have been replaced long before the "normal" types of battery disintegration occur.