

Thread
Floppy Emu Disk Emulator Updates
It's been a long time and many late nights coming:
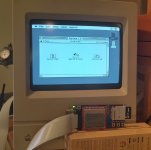
That's a Mac Classic booted from a System 7.0 high-density 1.44 MB emulated floppy. WOOOOO!
The same board now works on anything from a Mac 128K to the Mac II series (and beyond?), with 400K, 800K, and 1440K disk images in either raw or DiskCopy 4.2 format.
If you've got a board, you can try the new firmware here: http://www.bigmessowires.com/floppy-emu-1.0F-F7.zip
That's a Mac Classic booted from a System 7.0 high-density 1.44 MB emulated floppy. WOOOOO!
The same board now works on anything from a Mac 128K to the Mac II series (and beyond?), with 400K, 800K, and 1440K disk images in either raw or DiskCopy 4.2 format.
If you've got a board, you can try the new firmware here: http://www.bigmessowires.com/floppy-emu-1.0F-F7.zip
Wow, that is too cool that you got it working for 1.44 MB disks already!
The AVR firmware update (femu.bin) worked great, but I can't get the CPLD update to work. It says "could not open firmware.xvf" after I press NEXT to confirm that I want to update the CPLD. I even tried formatting my card and copying it again...any ideas?
I just tested and the previous firmware.xvf from the 64K update flashes, but I can't get the firmware.xvf from the linked floppy-emu-1.0F-F7.zip file to flash.
Final edit: Nevermind, got it to work. It's because the file was marked as locked on the SD card, and I noticed from the old floppy emu code that it tries to open the file read-write. So that's all the problem was Looks like the read-only flag is set on the file for some reason when I extract it from Windows. Now for testing!
Real final edit: It works! Just tested with a 1.44 MB Disk Copy 4.2 image I had sitting around. Yay! Thanks bigmessowires, nice work!
The AVR firmware update (femu.bin) worked great, but I can't get the CPLD update to work. It says "could not open firmware.xvf" after I press NEXT to confirm that I want to update the CPLD. I even tried formatting my card and copying it again...any ideas?
I just tested and the previous firmware.xvf from the 64K update flashes, but I can't get the firmware.xvf from the linked floppy-emu-1.0F-F7.zip file to flash.
Final edit: Nevermind, got it to work. It's because the file was marked as locked on the SD card, and I noticed from the old floppy emu code that it tries to open the file read-write. So that's all the problem was
Looks like the read-only flag is set on the file for some reason when I extract it from Windows. Now for testing!Real final edit: It works! Just tested with a 1.44 MB Disk Copy 4.2 image I had sitting around. Yay! Thanks bigmessowires, nice work!
Awesome, glad the 1.4 MB is working for you! But what's "already"? I've been wrestling with it for about a month, so I'm breathing a huge sigh of relief now.
I updated my blog with details about the 1.4 MB disk emulation support, if anyone's interested: http://www.bigmessowires.com/2013/11/01/1-4-mb-high-density-floppy-emulation/
I've been wrestling with it for about a month, so I'm breathing a huge sigh of relief now.I updated my blog with details about the 1.4 MB disk emulation support, if anyone's interested: http://www.bigmessowires.com/2013/11/01/1-4-mb-high-density-floppy-emulation/

Oh man, I bet! Your hard work has ended up creating a working solution, so that's awesome. It just feels like you've gotten so much working on the floppy emu in the last month, it's very impressive!But what's "already"?

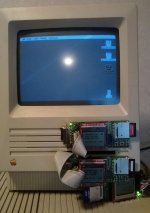
Fantastic work, bigmessowires! This is such a wonderful tool to make OS installation and testing easy, on older Macs.
I've started the assembly, and got everything done, all the way through the programming of the AVR. However, after adding the 74LVC244, 10k resistor, and 0.1uF cap, I can't get anything to display on the LCD. Do you have any quick suggestions as to points to check, on the board? I've already reviewed my solder points pretty closely, though I don't have a 10x loupe, yet.
Thanks!
- Alex
I've started the assembly, and got everything done, all the way through the programming of the AVR. However, after adding the 74LVC244, 10k resistor, and 0.1uF cap, I can't get anything to display on the LCD. Do you have any quick suggestions as to points to check, on the board? I've already reviewed my solder points pretty closely, though I don't have a 10x loupe, yet.
Thanks!
- Alex
I'm not really sure, but since I had to custom make those cables through the floppy opening, since the IDC connector doesn't fit, I'm kind of committed!
Maybe I'll throw mmcmaster's SCSI2SD internally, use the USB to ADB adapter, and have the mega-SE. I still like the idea of using the SE as an initial step in bitbanging the PDS, since 1) it's 16bits wide, 2) it's slow, and 3) it has the connector allowing for easy access to the signals, so maybe I'll turn it into an experimentation box.
Maybe I'll throw mmcmaster's SCSI2SD internally, use the USB to ADB adapter, and have the mega-SE. I still like the idea of using the SE as an initial step in bitbanging the PDS, since 1) it's 16bits wide, 2) it's slow, and 3) it has the connector allowing for easy access to the signals, so maybe I'll turn it into an experimentation box.
Well, I checked for shorts with my multimeter, in continuity mode, and didn't find anything. I also re-soldered all of the joints that were the least bit questionable, and tested the screen, itself, using an Arduino. I'll include the pictures of the ATmega and the '244, here.
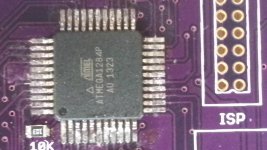
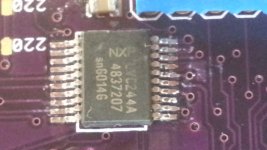
I also checked my solder joints with a loupe, and I couldn't find any bridges.
So, I am officially out of ideas.
Thanks!
- Alex
I also checked my solder joints with a loupe, and I couldn't find any bridges.
So, I am officially out of ideas.
Thanks!
- Alex
It's hard to tell, but some of the pins on the south side of the AVR look pretty close. But if it checks out with the continuity test, probably fine. Maybe double check the decoupling capacitors on the back of the AVR?
FWIW, I'm at 3 working out of 5 attempted builds. The very first one I attempted, I screwed up the AVR. At least when the AVR isn't functional, you can stop early. Then in the last batch I ruined the CPLD on one, removed it, replaced it with a new one, and AFAICT, it's all good except one CPLD pin is grounded that shouldn't be, and I have no idea where. That one is 100% assembled before finding the problem.
So, sorry about that. I can't really offer much advice, just empathy.
FWIW, I'm at 3 working out of 5 attempted builds. The very first one I attempted, I screwed up the AVR. At least when the AVR isn't functional, you can stop early. Then in the last batch I ruined the CPLD on one, removed it, replaced it with a new one, and AFAICT, it's all good except one CPLD pin is grounded that shouldn't be, and I have no idea where. That one is 100% assembled before finding the problem.
So, sorry about that. I can't really offer much advice, just empathy.
My problem turned out to be very simple/stupid: I did not solder the voltage regulator! With that in place, everything works file, so far.
I've found a great way to hand solder those surface mount ICs. If you drag-solder the chips to the board, and then use a power vacuum solder remover (I have a Hakko 808), the joints come out looking great.
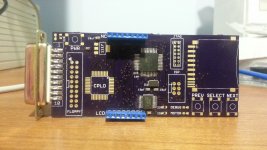
I can't manage to get my 0805s to lay perfectly flat, though. Those suckers are a pain!
Good luck!
- Alex
I've found a great way to hand solder those surface mount ICs. If you drag-solder the chips to the board, and then use a power vacuum solder remover (I have a Hakko 808), the joints come out looking great.
I can't manage to get my 0805s to lay perfectly flat, though. Those suckers are a pain!
Good luck!
- Alex
I added support for subdirectories on the SD card, because things were getting a little out of hand once you had more than a few dozen disk images.
This makes OS installs almost enjoyable! Just download the disk images from Apple, copy them to your SD card, boot the Mac from the Install Disk 1 image, and off you go.
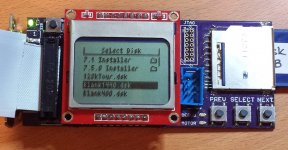
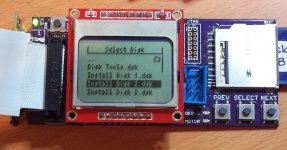
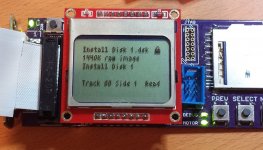
This makes OS installs almost enjoyable! Just download the disk images from Apple, copy them to your SD card, boot the Mac from the Install Disk 1 image, and off you go.
I added Disk Copy 4.2 image support about a week ago, but it was buried in a footnote of another post. DC4.2 images are mounted as read-only, since the image is checksummed, and I'm not prepared to recompute the checksum on the fly.
I've ordered parts to build some more Floppy Emus, with a new v1.1 board that adds a couple of extra features. Hopefully I'll have some ready in a few weeks!
DC4.2 images are mounted as read-only, since the image is checksummed, and I'm not prepared to recompute the checksum on the fly.I've ordered parts to build some more Floppy Emus, with a new v1.1 board that adds a couple of extra features. Hopefully I'll have some ready in a few weeks!
I finally finished building my board (yay!), and it seems to work. I managed to load the CPLD firmware, successfully, and the board recognizes valid (it took me a while to figure out which disk images are supported) images just fine.
However, when plugged in to my test machine (a Mac IIci), every time I try to mount an image, I get the "This disk is unreadable by this Macintosh." dialog box. The images that I have tried, so far, come from Apple's legacy software archive, and are System 6.0.8 on 1.44mb floppies, and System 7.0.1, on the same. These appear to be Disk Copy 4.2 images, from what I can tell. The firmware on the board does indicate that they are Disk Copy images, and locks them, as the docs state.
I've also tried using Mini vMac's convertDC42 program to convert those images to raw images, but the resulting files aren't readable, to the board, and don't show up in the menu. Does anyone have any advice on creating the raw .dsk format images? I also tried downloading the Mini vMac "blanks" archive, and putting the 1.4MB image, on the card. That was indeed recognized as a raw disk image, but the lock symbol appeared, and I was again presented with the unreadable disk dialog.
Any ideas would be welcome. And thanks, again, to BMOW for such an incredible device!
- Alex
However, when plugged in to my test machine (a Mac IIci), every time I try to mount an image, I get the "This disk is unreadable by this Macintosh." dialog box. The images that I have tried, so far, come from Apple's legacy software archive, and are System 6.0.8 on 1.44mb floppies, and System 7.0.1, on the same. These appear to be Disk Copy 4.2 images, from what I can tell. The firmware on the board does indicate that they are Disk Copy images, and locks them, as the docs state.
I've also tried using Mini vMac's convertDC42 program to convert those images to raw images, but the resulting files aren't readable, to the board, and don't show up in the menu. Does anyone have any advice on creating the raw .dsk format images? I also tried downloading the Mini vMac "blanks" archive, and putting the 1.4MB image, on the card. That was indeed recognized as a raw disk image, but the lock symbol appeared, and I was again presented with the unreadable disk dialog.
Any ideas would be welcome. And thanks, again, to BMOW for such an incredible device!
- Alex
You're almost there! Your disk images are fine, but it sounds like there's a problem in the connections between the Mac floppy connectors and the CPLD, have you re-checked those? In particular, check PH0 through PH3, /WREQ, SEL, /ENABLE.EXT, and RD for opens or shorts between neighboring traces, for both connectors and the CPLD.
The Mini vMac "blank" images may have been read-only files, which is why you see the lock icon. Put the SD card in your PC, and clear the read-only flag for all the files.
The Mini vMac "blank" images may have been read-only files, which is why you see the lock icon. Put the SD card in your PC, and clear the read-only flag for all the files.
Here's my suggestion:
Automate long disk-swapping sessions by allowing the user to select two disks and then automatically switch between them when one is ejected.
A little while back I was working on a LEGO contraption to do it with real floppies, but that failed because LEGO and floppies don't fit well together :-/ .
Automate long disk-swapping sessions by allowing the user to select two disks and then automatically switch between them when one is ejected.
A little while back I was working on a LEGO contraption to do it with real floppies, but that failed because LEGO and floppies don't fit well together :-/ .
Thats why you dont want to simply drag solder and use a vacuum desolderer to remove the excess. Because it mashes the solder down and creates shorts.
Best way: Use an SMD291/SMD294 flux from chipquik. You can lay down a tiny bead around the IC, and wet your tip with solder. slide the tip on the chip as you were doing, The flux will allow the solder to reflow properly and evenly. Remove any bridges/excess with solder braid! Then the removed areas, re-touch with the tip to straighten the flow. They will look machine assembled/soldered this way.
this is the best way to do it outside of using a stencil, and reflow/hotplate.
Best way: Use an SMD291/SMD294 flux from chipquik. You can lay down a tiny bead around the IC, and wet your tip with solder. slide the tip on the chip as you were doing, The flux will allow the solder to reflow properly and evenly. Remove any bridges/excess with solder braid! Then the removed areas, re-touch with the tip to straighten the flow. They will look machine assembled/soldered this way.
this is the best way to do it outside of using a stencil, and reflow/hotplate.
New software: app version 1.0H firmware 9. http://www.bigmessowires.com/floppy-emu-1.0H-F9.zip
The big update here is 1.44 MB floppy write support. WOOHOO! It was like peeling the layers of an onion, with one weird timing/logic bug hidden by another, layer after layer all the way down. At one point I'd just about given up on it ever working, but I'm glad I didn't.
This version also includes the support for subdirectories and long filenames on the SD card, that I posted photos of earlier.
I think the firmware has reached the max possible complexity limit for debugging without a real debugger. Troubleshooting weird timing and logic problems with print statements and blinking LEDs nearly drove me insane. Luckily there's not too much more to add at this point. Whew!
The big update here is 1.44 MB floppy write support. WOOHOO! It was like peeling the layers of an onion, with one weird timing/logic bug hidden by another, layer after layer all the way down. At one point I'd just about given up on it ever working, but I'm glad I didn't.
This version also includes the support for subdirectories and long filenames on the SD card, that I posted photos of earlier.
I think the firmware has reached the max possible complexity limit for debugging without a real debugger. Troubleshooting weird timing and logic problems with print statements and blinking LEDs nearly drove me insane. Luckily there's not too much more to add at this point. Whew!
New software: app version 1.0I firmware 10. http://www.bigmessowires.com/floppy-emu-1.0I-F10.zip
This version extends compatibility to the Power Macintosh and Quadra series. Their ROMs do some track stepping recalibration stuff that was breaking earlier version of the Floppy Emu software.
Still waiting on parts delivery from China so I can build some more of these. xx(
This version extends compatibility to the Power Macintosh and Quadra series. Their ROMs do some track stepping recalibration stuff that was breaking earlier version of the Floppy Emu software.
Still waiting on parts delivery from China so I can build some more of these. xx(
All I can say is, what a fantastic product!
On a side note, how does everyone make DiskCopy 4.2 images? I assume that you use a real Mac with a real superdrive? I've been trying, with little success, to find an alternative. This would be especially handy since Apple has many Disk Copy 6.x images on their HTTP archive.
- Alex
On a side note, how does everyone make DiskCopy 4.2 images? I assume that you use a real Mac with a real superdrive? I've been trying, with little success, to find an alternative. This would be especially handy since Apple has many Disk Copy 6.x images on their HTTP archive.
- Alex
I will look in to finding the Disk Copy 6.x format documentation.
As to directly running Disk Copy, that's a no go, as Mini vMac doesn't really emulate a floppy drive. Actually, that seems to be a shortcoming of all of the Macintosh emulators. For most purposes, it doesn't really matter, but for image creation and writing, it is somewhat critical. I have tried Basilisk II, MESS, Mini vMac, and Sheepshaver.
Thanks!
As to directly running Disk Copy, that's a no go, as Mini vMac doesn't really emulate a floppy drive. Actually, that seems to be a shortcoming of all of the Macintosh emulators. For most purposes, it doesn't really matter, but for image creation and writing, it is somewhat critical. I have tried Basilisk II, MESS, Mini vMac, and Sheepshaver.
Thanks!
A few minutes of searching suggests that DiskCopy 6.x format is NDIF, which I think is just a raw disk image in the data fork with all the metadata in the resource fork. If you copy the file to a Windows volume, it'll split the forks and put each fork into a separate file. If the data fork file is exactly 1,474,560 bytes (512 bytes times 2880 sectors), then it's a raw HD disk image and should work fine with Floppy Emu. Latest firmware no longer cares if the file extension is .dsk as long as the image is the right size or has the right signature.
Indeed, my searching seems to indicate the same.
I also found this program, which seems to work well, though I have only tested it a bit:
http://sunsky3s.s41.xrea.com/dmgconverter/index.html
It seems to create valid raw images, given a variety of formats, fairly easily. I also ran across an old hint that additional formats can be enabled for Disk Utility, using the following:
In my (limited) testing, on 10.8.5, it does enable the formats, but trying to create a Disk Copy 4.2 image from an existing UDIF image caused an error. I'll post more, as I do more testing.
I also found this program, which seems to work well, though I have only tested it a bit:
http://sunsky3s.s41.xrea.com/dmgconverter/index.html
It seems to create valid raw images, given a variety of formats, fairly easily. I also ran across an old hint that additional formats can be enabled for Disk Utility, using the following:
Code:
$ defaults write com.apple.DiskUtility advanced-image-options -bool trueI now have assembled and tested Floppy Emus you can buy from my web site, if anyone would like one. viewtopic.php?f=4&t=22539 
Thanks! It's already gs-compatible, when connected to the daisy chain board from an external Apple 3.5 drive - see uniserver's experiments in a separate thread. I think the IIe and IIc use a different floppy interface, though.
Anyone know if the non-Twiggy Lisa uses the same drive mechanism as the Mac? If so, then Floppy Emu could theoretically work on a Lisa, if the firmware were updated to support tags (extra data on the floppy that's not part of the sector itself).
Anyone know if the non-Twiggy Lisa uses the same drive mechanism as the Mac? If so, then Floppy Emu could theoretically work on a Lisa, if the firmware were updated to support tags (extra data on the floppy that's not part of the sector itself).
Actually, the IIc can support SmartPort drives (IIgs-style) natively, and so can the IIe, given an appropriate controller card.
Having now read the other thread (sorry that I missed that, earlier), and it sounds like you're already on the path.
Again, thanks so much for such a great device!
Thanks!
- Alex
Having now read the other thread (sorry that I missed that, earlier), and it sounds like you're already on the path.
Again, thanks so much for such a great device!
Thanks!
- Alex
The 400k drive mechanism is the same. You could also use an 800k drive under Macworks with a ROM replacement.
I have Lisas running both LisaOS and Macworks, if you're feeling rowdy on the firmware front
I guess I could try a 400k image on my 400k Macworks machine on the internal floppy cable. Since it uses a Mac drive I don't think it should be a problem, but I don't want to fry my new Floppy Emu I've released a new firmware version: 1.0L F11. This adds the ability to fine-tune the LCD contrast, and save the contrast setting to EEPROM. There seems to be a lot of variability from one LCD to the next, or even with the same LCD from day to day, so it was getting difficult for me to find a single contrast setting that worked well for all LCDs. Now you get to tweak the contrast to exactly how you like it.
I just tried it again with my 512K and it works OK here. Firmware 1.0L-F11. The only thing that's new in the latest firmware is LCD contrast adjustment, so it shouldn't have any effect on 128K/512K support unless I screwed up something. What kind of problem are you seeing when you try it? Does it work if you switch back to 1.0K-F11?
Might your 5V supply be out of adjustment? Or maybe something got damaged with the hardware when you had that glitch a few days ago?
Might your 5V supply be out of adjustment? Or maybe something got damaged with the hardware when you had that glitch a few days ago?
its possible, i am not sure what the glitch was, to be honest
it keeps saying sd card error.
and there is no issues with the sd card… pop it in IIsi or SE/30 or portable and it works fine.
ill try the 128k/512 again.
-ah, you see my issue is, when i am forcing the floppy emu onto the floppy port, i get skittish because i don't trust
the pcb can handle the force I'm putting on it.
looks like i have isolated the issue to the 512k only. might be bad resistor network.
also the 512k has a nasty floppy port… it was the one from flordia …
512k says
Fatal Error
SD card error 10:1
and I notice the contrast flickering … darker and lighter.
tried it on the 128k and it works as long as i really grind it into the floppy emu into the floppy port.
i guess wierd things pop up when you factor in the age of these machines...
it keeps saying sd card error.
and there is no issues with the sd card… pop it in IIsi or SE/30 or portable and it works fine.
ill try the 128k/512 again.
-ah, you see my issue is, when i am forcing the floppy emu onto the floppy port, i get skittish because i don't trust
the pcb can handle the force I'm putting on it.
looks like i have isolated the issue to the 512k only. might be bad resistor network.
also the 512k has a nasty floppy port… it was the one from flordia …
512k says
Fatal Error
SD card error 10:1
and I notice the contrast flickering … darker and lighter.
tried it on the 128k and it works as long as i really grind it into the floppy emu into the floppy port.
i guess wierd things pop up when you factor in the age of these machines...