

Thread
How to Repair a G5 Quad Dual Pump LCS
After 10 years, it seems like these are starting to fail at an alarming rate! So far, I’ve seen 3 bad dual pump cooling units with each one failing due to a clogged water block. In this article I intend to cover testing, flushing and filling.
What you’ll need:
8 hose clamps (about ½ inch)
Distilled water
Dielectric grease
White Vinegar
Prestone Dex-Cool concentrate (Orangish-Red in color)
Size 27 Orings (Viton preferred but not required)
Artic silver thermal grease
About 3ft of 3/8 Clear Vinyl tubing (Non-Braided recommended)
Tools:
12 VDC power source
Apple service Diagnostics 2.6.3 (2.5.8 will not work on PCIe models)
Automotive hand vacuum pump
Funnel
Mini Screwdriver set
Razor Blade
Scissors
Some way of connecting your faucet to the 3/8th hose (see what I used)
Temperature Controlled Heat gun or Hot air station
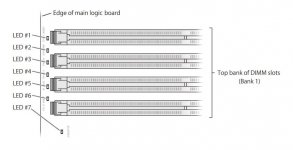
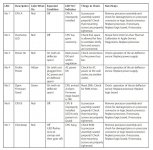
Most of the time when the LCS fails a Quad G5 will turn on but will not boot. You’ll likely see red lights turn on inside the computer (Usually overtemp & checkstop) and your fans will start spinning like crazy! Since your computer won’t boot you really don’t know which cpu is overheating! The easiest way to figure is out is to bench test it.
A Brief Guide on the Removal of the LCS
A. Remove your Graphics Card.
B. Remove the plastic rivet under the graphics card and slide off the G5 cover (toward the front of the tower).
C. Disconnect and remove your rear fans.
D. Remove your front fans.
E. Remove the air deflector (on the radiator).
F. Disconnect the electrical connector to the Pumps.
G. Remove/loosen the screws on the LCS system and remove it from the computer.
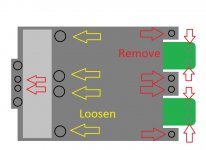
H. Remove the screws on the CPU’s and set them aside.
NOTE: Be sure to mark which CPU was the top and which CPU was the bottom. If you swap them your fans will run full blast until you run a thermal calibration.
For more info see this youtube video:
What you’ll need:
8 hose clamps (about ½ inch)
Distilled water
Dielectric grease
White Vinegar
Prestone Dex-Cool concentrate (Orangish-Red in color)
Size 27 Orings (Viton preferred but not required)
Artic silver thermal grease
About 3ft of 3/8 Clear Vinyl tubing (Non-Braided recommended)
Tools:
12 VDC power source
Apple service Diagnostics 2.6.3 (2.5.8 will not work on PCIe models)
Automotive hand vacuum pump
Funnel
Mini Screwdriver set
Razor Blade
Scissors
Some way of connecting your faucet to the 3/8th hose (see what I used)
Temperature Controlled Heat gun or Hot air station
Most of the time when the LCS fails a Quad G5 will turn on but will not boot. You’ll likely see red lights turn on inside the computer (Usually overtemp & checkstop) and your fans will start spinning like crazy! Since your computer won’t boot you really don’t know which cpu is overheating! The easiest way to figure is out is to bench test it.
A Brief Guide on the Removal of the LCS
A. Remove your Graphics Card.
B. Remove the plastic rivet under the graphics card and slide off the G5 cover (toward the front of the tower).
C. Disconnect and remove your rear fans.
D. Remove your front fans.
E. Remove the air deflector (on the radiator).
F. Disconnect the electrical connector to the Pumps.
G. Remove/loosen the screws on the LCS system and remove it from the computer.
H. Remove the screws on the CPU’s and set them aside.
NOTE: Be sure to mark which CPU was the top and which CPU was the bottom. If you swap them your fans will run full blast until you run a thermal calibration.
For more info see this youtube video:
Testing
A. Place the LCS Assembly on a work surface oriented as if it were still in the computer.
B. Apply 12VDC to pins 1, 2, 5 & 6. (The pins are numbered).
C. Apply ground to pins 7 & 8 (You should hear the pumps come on).
D. Set your seat gun for 200F and target the center of the water block for 15 seconds.
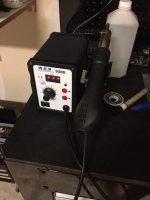
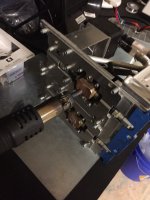
E. Remove the heat gun and place your finger on the water block, if coolant is flowing properly it should be cold or mildly warm but not hot.
F. Do this a few more times to ensure consistent operation
G. Repeat steps D-F on the other water block
I call this the “Finger Test.” I know it’s not completely scientific but it’s a good indicator as to whether the system is working or not.
Also: Another good indicator of a clogged waterblock is a buzzing pump.
Draining the System
Note: For this procedure, only the 4 upper hoses need to be removed.
A. Remove the “Cooligy” cover by removing the two screws that secure it.
B. Remove the crimped on hose clamps by prying against the crimp or cutting the band.
C. Chisel off the epoxy by placing a small screwdriver on it and lightly tapping.
D. Place the unit in a sink.
E. Cut each hose sideways from the pump to the radiator and turn the unit upside down to let it drain.
F. Remove pieces of clear heat shrink from the pump ports and radiator ports.
G. Remove both pumps by unscrewing the screws securing the mount and set the pumps aside.
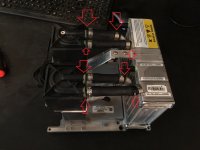
Note: Be careful not to damage or lose the flow restrictors that are attached to the metal “Z” Tube.
A. Place the LCS Assembly on a work surface oriented as if it were still in the computer.
B. Apply 12VDC to pins 1, 2, 5 & 6. (The pins are numbered).
C. Apply ground to pins 7 & 8 (You should hear the pumps come on).
D. Set your seat gun for 200F and target the center of the water block for 15 seconds.
E. Remove the heat gun and place your finger on the water block, if coolant is flowing properly it should be cold or mildly warm but not hot.
F. Do this a few more times to ensure consistent operation
G. Repeat steps D-F on the other water block
I call this the “Finger Test.” I know it’s not completely scientific but it’s a good indicator as to whether the system is working or not.
Also: Another good indicator of a clogged waterblock is a buzzing pump.
Draining the System
Note: For this procedure, only the 4 upper hoses need to be removed.
A. Remove the “Cooligy” cover by removing the two screws that secure it.
B. Remove the crimped on hose clamps by prying against the crimp or cutting the band.
C. Chisel off the epoxy by placing a small screwdriver on it and lightly tapping.
D. Place the unit in a sink.
E. Cut each hose sideways from the pump to the radiator and turn the unit upside down to let it drain.
F. Remove pieces of clear heat shrink from the pump ports and radiator ports.
G. Remove both pumps by unscrewing the screws securing the mount and set the pumps aside.
Note: Be careful not to damage or lose the flow restrictors that are attached to the metal “Z” Tube.
Flushing (with White Vinegar)
A. Place the LCS on its side.
B. Attach a 1ft tube to input port.
C. Mix a 50/50 solution of vinegar and hot tap water.
D. Pour the solution down the input port using a funnel.
E. Connect the end of the 1 foot tube to the output port.
F. Let stand until cool.
G. Turn the LCS upside down so the solution falls into the tube and then turn the LCS onto its side to send the solution the other way.
H. Apply heat to the water block with a heat gun or hot air tool.
I. Allow The LCS to cool.
J. Repeat steps C-I 2-3 times.
K. Disconnect the 1ft tube from the either port and attach another hose.
L. Connect the input port hose to your faucet via adapter and turn on the faucet (I used a flex tube bought at Advance Auto Parts.)
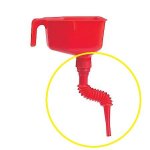
M. Turn off the faucet and repeat step K with the faucet connected to the output port.
N. Repeat steps K & L 2-3 times or until clear water can be seen.
O. Using a funnel, pour in 100% distilled water into the input port until it flows out the output port.
Refilling
Because all of the filling ports are crimped off (and have epoxy covering them) I have come up with a reliable alternate method of filling the system:
A. Go ahead and reattach the cooling pump assembly with the 6 screws.
B. Measure and cut a 3 inch piece of Vinyl tubing and attach it to the "Z” Tube. (Make sure you still have the restrictor!)
C. Slide two loose hose clamps over the Vinyl tubing and connect the tube to the pump.
D. Place a hose clamp on each side and tighten them down (The part with the screw should be down if you want to put your “G5” cover back on.)
E. Cut a 4.5 inch piece and attach it to the radiator fitting.
F. Place 1 foot piece of tubing on the pumps outlet port
G. Place the LCS in your sink with the radiator facing down.
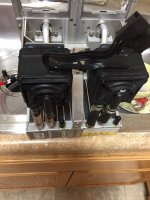
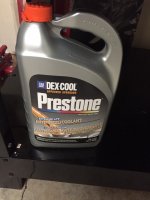
H. Fill a spare container with 75% distilled water and 25% Dex-Cool and stir
I. Fill the system with the coolant you just made using the 4.5 inch hose connected to the radiator using a funnel, continue to pour coolant into the funnel until you see the coolant begin to flow out of the pumps output port. (The smaller hose should be completely full of coolant at this point. Also, if the coolant doesn’t flow on its own then use the hand vacuum pump on the pump’s output port.)
J. Place two hose clamps on the 4.5 inch hose.
K. Now, place your finger over the pump’s output port and fill the 4.5 inch hose up to the top.
L. Connect the hose to the pump and bench check the system
M. If the bench check passes then tighten the clamps
Bleeding
Bleeding isn’t always necessary, you may notice a small bubble in each tube after the filling procedure and that’s alright. But, if you have multiple bubbles or large bubbles or if the pump makes a grinding noise for longer than 30 seconds you need to bleed it.
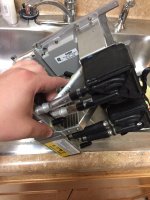
A. Place The at 45 degree angle as pictured and either disconnect the 4.5 inch hose from the pump side or cut the hose with a razor and place a new hose on the radiator.
B. Now, place your finger over the pump’s output port and fill the 4.5 inch hose up to the top.
C. Connect the hose to the pump and bench check the system.
D. If the bench check passes then tighten the clamps.
A. Place the LCS on its side.
B. Attach a 1ft tube to input port.
C. Mix a 50/50 solution of vinegar and hot tap water.
D. Pour the solution down the input port using a funnel.
E. Connect the end of the 1 foot tube to the output port.
F. Let stand until cool.
G. Turn the LCS upside down so the solution falls into the tube and then turn the LCS onto its side to send the solution the other way.
H. Apply heat to the water block with a heat gun or hot air tool.
I. Allow The LCS to cool.
J. Repeat steps C-I 2-3 times.
K. Disconnect the 1ft tube from the either port and attach another hose.
L. Connect the input port hose to your faucet via adapter and turn on the faucet (I used a flex tube bought at Advance Auto Parts.)
M. Turn off the faucet and repeat step K with the faucet connected to the output port.
N. Repeat steps K & L 2-3 times or until clear water can be seen.
O. Using a funnel, pour in 100% distilled water into the input port until it flows out the output port.
Refilling
Because all of the filling ports are crimped off (and have epoxy covering them) I have come up with a reliable alternate method of filling the system:
A. Go ahead and reattach the cooling pump assembly with the 6 screws.
B. Measure and cut a 3 inch piece of Vinyl tubing and attach it to the "Z” Tube. (Make sure you still have the restrictor!)
C. Slide two loose hose clamps over the Vinyl tubing and connect the tube to the pump.
D. Place a hose clamp on each side and tighten them down (The part with the screw should be down if you want to put your “G5” cover back on.)
E. Cut a 4.5 inch piece and attach it to the radiator fitting.
F. Place 1 foot piece of tubing on the pumps outlet port
G. Place the LCS in your sink with the radiator facing down.
H. Fill a spare container with 75% distilled water and 25% Dex-Cool and stir
I. Fill the system with the coolant you just made using the 4.5 inch hose connected to the radiator using a funnel, continue to pour coolant into the funnel until you see the coolant begin to flow out of the pumps output port. (The smaller hose should be completely full of coolant at this point. Also, if the coolant doesn’t flow on its own then use the hand vacuum pump on the pump’s output port.)
J. Place two hose clamps on the 4.5 inch hose.
K. Now, place your finger over the pump’s output port and fill the 4.5 inch hose up to the top.
L. Connect the hose to the pump and bench check the system
M. If the bench check passes then tighten the clamps
Bleeding
Bleeding isn’t always necessary, you may notice a small bubble in each tube after the filling procedure and that’s alright. But, if you have multiple bubbles or large bubbles or if the pump makes a grinding noise for longer than 30 seconds you need to bleed it.
A. Place The at 45 degree angle as pictured and either disconnect the 4.5 inch hose from the pump side or cut the hose with a razor and place a new hose on the radiator.
B. Now, place your finger over the pump’s output port and fill the 4.5 inch hose up to the top.
C. Connect the hose to the pump and bench check the system.
D. If the bench check passes then tighten the clamps.
Changing O-rings
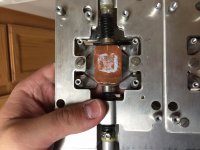
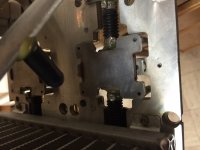
Under the “Cooligy cover” you’ll find two size 27 orings that keep the CPU clamp aligned for assembly purposes. Even if they’re broken you can certainly reattach the CPUs but since I have some I might as well replace them. Here are some pictures on how that’s routed. Once changed you can go ahead and put the cover back on.
Under the “Cooligy cover” you’ll find two size 27 orings that keep the CPU clamp aligned for assembly purposes. Even if they’re broken you can certainly reattach the CPUs but since I have some I might as well replace them. Here are some pictures on how that’s routed. Once changed you can go ahead and put the cover back on.