
Thread
AppleFile
Problem: On a stock Apple IIe the Profile is far too wide to sit on top of the case and doesn't match with the computer or monitor. The only real device that nicely fits under the monitor is the Duodisk drive.

Solution: The AppleFile.

What it is: It's a DuoDisk drive with the internals removed and the front filled in with Bondo and textured with a sponge while the filler is still soft. An LED is recycled and placed above the Apple logo to act as an Indicator when the drive is busy.
Internally there will be space for one half height 5.25" SCSI disk (in my case a Seagate ST-225N for authentic drive capacity and sounds ) ) and a small 5V/12V power supply.
On the rear there will be the power switch, a standard IEC computer power cable socket and a centronics 50 pin SCSI connector to allow the use of Apple's own SCSI cable.
Using the Sandwich II SCSI card it is a ProDOS bootable volume.

OPTION: Make SCSI interface on back of AppleFile passive so you can daisy chain in more SCSI devices.
Challenges:
-Get the bondo textured to match the rest of the drive
-find paint that best matches the platinum color of the drive to paint over Bondo
Time to Completion: Pending. Just moved and currently sourcing components.
Solution: The AppleFile.
What it is: It's a DuoDisk drive with the internals removed and the front filled in with Bondo and textured with a sponge while the filler is still soft. An LED is recycled and placed above the Apple logo to act as an Indicator when the drive is busy.
Internally there will be space for one half height 5.25" SCSI disk (in my case a Seagate ST-225N for authentic drive capacity and sounds
) ) and a small 5V/12V power supply.On the rear there will be the power switch, a standard IEC computer power cable socket and a centronics 50 pin SCSI connector to allow the use of Apple's own SCSI cable.
Using the Sandwich II SCSI card it is a ProDOS bootable volume.
OPTION: Make SCSI interface on back of AppleFile passive so you can daisy chain in more SCSI devices.
Challenges:
-Get the bondo textured to match the rest of the drive
-find paint that best matches the platinum color of the drive to paint over Bondo
Time to Completion: Pending. Just moved and currently sourcing components.
Very  I love it! :approve:
< over the top >
Looks to me like a get two and stack 'em deal for a non A2 - MacHack. [ ] ]'>
Slot-loader DVD behind the left bottom 5.25" opening . . .
. . . Zip centered above it left top . . .
. . . PSU bottom right . . .
. . . MacMini top right . . .
. . . Plexi band in between with modern I.O. boards and LEDs . . .
. . . Spray to match Semi-Gloss Black USB/Wireless KBD/Mouse . . . no texturing . . .
. . . Top with Black 15" KDS/Radius LCD . . .
. . . add FEETS . . .
. . . save one FDD Bezel for center-mounting in fabrication of AppleDesign concept sketch for original Mac. }
< over the top >
I love it! :approve: < over the top >
Looks to me like a get two and stack 'em deal for a non A2 - MacHack. [
] ]'>Slot-loader DVD behind the left bottom 5.25" opening . . .
. . . Zip centered above it left top . . .
. . . PSU bottom right . . .
. . . MacMini top right . . .
. . . Plexi band in between with modern I.O. boards and LEDs . . .
. . . Spray to match Semi-Gloss Black USB/Wireless KBD/Mouse . . . no texturing . . .
. . . Top with Black 15" KDS/Radius LCD . . .
. . . add FEETS . . .
. . . save one FDD Bezel for center-mounting in fabrication of AppleDesign concept sketch for original Mac. }
< over the top >
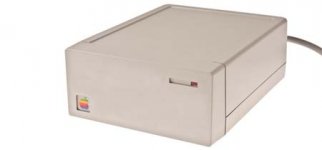
Wow, that UniDisk looks like it would be perfect for a 3.5" drive to be nudged inside though adding the PSU might take a bit of work. I guess because you will be dealing with a smaller drive and this a lighter power load you can take one of those 5v/12v wallwarts, gut it and mount it inside and again have the power switch and plug on the back. I kinda did the same when I installed a hard drive inside a TRS-80 Model II.

I'd actually recommend that hack first because Unidisks grow on trees compared to DuoDisks.
I did some glance measurements and you would have to mount a half height 5.25" hard drive sideways in the DuoDisk as the case is only deep enough to fit floppy drives and not hard drives. It might still work. I'll double check on this.
What would be even cooler is to setup a smartport HD in there along with a 5.25 drive --- and leave one of the slots open. There's plenty of room for that, and the microcontroller/flash drive is perfect for just sitting along on the bus with floppy drives. It wouldn't be as fast as SCSI, but it also wouldn't require a SCSI card either

Bondo day. No turning back now. xx(


You can't really texture it until you put the paint on. The sanding of the bondo completely takes it off.
I'm considering going to a paint shop with a digital color matching system and seeing if I can get a small can mixed up. Then I can either try brushing it on or mix in thinner and use an air brush.
Looking at the back I realize I can't easily install a regular 50 pin SCSI connector without making a mess so I'll just have a regular DB25 connector on the outside that breaks to the usual SCSI ribbon cable inside.

You forgot: "Vintage, Steve Jobs." :beige:
Lookin' great . . . try greasing up the LED, form a small bump of bondo around it, filling in the hole, remove the LED as the bondo starts to firm up . . .
. . . then sand it smooth after the bondo finishes curing. That ought to give you a custom made, press fit socket for the LED.
I would of not gone ahead with this if the drives were of notably rarity or if I was not confident the final result will look appealing. I have to do a lot to MAKE stuff fit without adding too many new holes Mounting plates have to be fabricated, bulkheads are reused. It comes at the expsnse that you may require akward cabling to get it working but if it looks and sounds era authentic without ANY exterior signs that it has been meddled with I call it a success.
It's like the hard drive in my TRS-80 or the MXI graphics card installed in my Origin 2000. Unless you look really hard you would never know.
There's a lot of other things I want to do but refuse to do so because I know the results will not be to grade.
BTW, the guts of the DuoDisk are for sale in case anyone wants them. I'm obviously not going to throw that hardware out.

Discovered that the Home depot mixes custom color matched 200ml cans of paint for $4.99. Just bring in a sample and they can do it.
Ill bring the AppleFile in tomorrow and see if they can make me a small can.
....after that, I'll look into seeing if I can get a can of NeXT Black mixed up.
Ill bring the AppleFile in tomorrow and see if they can make me a small can.
....after that, I'll look into seeing if I can get a can of NeXT Black mixed up.
Lidded cans in the 1/2 Pt. (?) sample size. I did the same thing at Lowe's, a Quart of matched paint for the high heeled, platform feets (cooling vent access on carpet) hack for the Q700 triplets.
For spray application, either store should have compressed air canister type, refillable spray bombs for the mixed paint. Experiment with foam rollers, they may add an acceptable substitute texture process for your front bezel.
For spray application, either store should have compressed air canister type, refillable spray bombs for the mixed paint. Experiment with foam rollers, they may add an acceptable substitute texture process for your front bezel.
Complete.


In the very end it turns out that while I ahd the lid with me at work so I could get the paint mixed that evening, my mom went ahead and painted the front on her own...
Well I guess I can't complain if it looks nice however now I have a can of off-tint beige paint.

All that remains now is to install the PSU and wiring but that will take a few months until my workbench is assembled and I have located all my tools. Anyways, from the outside now we have what looks like an apple product and looks quite nice.
In the very end it turns out that while I ahd the lid with me at work so I could get the paint mixed that evening, my mom went ahead and painted the front on her own...
Well I guess I can't complain if it looks nice however now I have a can of off-tint beige paint.
All that remains now is to install the PSU and wiring but that will take a few months until my workbench is assembled and I have located all my tools. Anyways, from the outside now we have what looks like an apple product and looks quite nice.
When the paint dried after brushing it on it seemed to feel somewhat similar so I stuck with that. You can't also see a difference unless you look closely.
I said I would deliver a passable product and I have so far. I hope to get this finishe before the summer rolls around.
Speaking of passable, I'm on the fence on which logo looks better.

OR...

I said I would deliver a passable product and I have so far. I hope to get this finishe before the summer rolls around.
Speaking of passable, I'm on the fence on which logo looks better.
OR...
I hope the logo's heading the backside on a product panel with the serial #00001. Looking at the stack pic, I can't imagine putting a logo on the front, the stacked rainbows on the right side are perfection in terms of embellishment. As proud of such a hack as I'd be, I'd stick to the .TXT free simplicity of the front bezel of its progenitor.
BTW, the simplicity of the top version appeals to me, not to mention the fact that it's far more suitable for cutting in vinyl.
BTW, the simplicity of the top version appeals to me, not to mention the fact that it's far more suitable for cutting in vinyl.
The logo is to go just on a nice photogrpah or two of the drive. I can't properly print it on the back of the drive where DuoDisk currently sits because it's all part of one larger badge.
Thje white outlined one is taking refernce from the FileWare logo. The whole thign is actually traced because I don't think there is an actual font for the old Apple typeset.
Also, it took me forever to find that bloody carpet.
Thje white outlined one is taking refernce from the FileWare logo. The whole thign is actually traced because I don't think there is an actual font for the old Apple typeset.
Also, it took me forever to find that bloody carpet.

I'm working on some product packaging with some vintage logos on it. I just happened to have the font. Specifically, it's Motter Tektura Cyrillic. It's a little more bold than the normal Motter Tektura.
Apple's was still custom, though, because it had a few custom characters (the S, ], [, and / are different.) I had to make a new S.
Apple's was still custom, though, because it had a few custom characters (the S, ], [, and / are different.) I had to make a new S.
Yeah, I bought the files to help square it out. It's still a little ragged but form the photos it's now hard to notice.
I noticed that after looking at a few of the fonts and realized "say! these arenn't the same!" Thanks for noting the Cyrillic part. Thanks for the awesome custom badge. I guess at the very least now I can have a small custom sticker made but it won't feel the same as a proper stamped aluminum badge but that's for someone else to try if they would like to make their own Applefile. I like the Apple-only front.
to make your searching safer, I grabbed it here.
Wouldn't look right. If you look at Apple peripherals of the time, if it had rounded edges (ProFile, Unifile, and the Apple III) it had the apple logo and our badge on the left side.
Around the time of the IIe it changed. If you look at the IIe platinum or either the monochrome or color monitors the apple logo is on the right and if you look at the DuoDisk you had that groove and everything had nice hard edges. If anything my lack of a platinum IIe breaks the uniformity on my end but I think the badge would even more break the theme going on with the peripherals where there's no badges at all except the apple logo on the right.
Around the time of the IIe it changed. If you look at the IIe platinum or either the monochrome or color monitors the apple logo is on the right and if you look at the DuoDisk you had that groove and everything had nice hard edges. If anything my lack of a platinum IIe breaks the uniformity on my end but I think the badge would even more break the theme going on with the peripherals where there's no badges at all except the apple logo on the right.
Yeah I wouldn't put anything on the front. It matches the stack perfectly as is. The text of that logo should go on the back where the duodisk text is if you we're going to put it on the physical device at all.
There's probably a way to print on an aluminum plate, but I bet it'd be the most expensive part of the whole build.
There's probably a way to print on an aluminum plate, but I bet it'd be the most expensive part of the whole build.
Adding SCSI was tedious. I had to manually crimp the 50 to 25 pin adapter. Pin 1 is ground and attaches to the standoff nuts.

The DB25 port fits perfectly where the old connector went. The only change is I cut up a parallel port bulkhead from a a PC and press fit it in with epoxy.

Here's a mock-up of the internals. This is about what the final mounting places will be.

Power and the on/off switch can't go under the SCSI port because of the design of the back so I decided it would be best to have it on the other side of the case and route it over to the PSU. Here's what the back of the AppleFile now looks like:

Still need to find out how to wipe off that wax marker and other bits of grime. I tried rubbing alcohol but all that did was wipe off the paint that I was not told was water soluble. xx(
The DB25 port fits perfectly where the old connector went. The only change is I cut up a parallel port bulkhead from a a PC and press fit it in with epoxy.
Here's a mock-up of the internals. This is about what the final mounting places will be.
Power and the on/off switch can't go under the SCSI port because of the design of the back so I decided it would be best to have it on the other side of the case and route it over to the PSU. Here's what the back of the AppleFile now looks like:
Still need to find out how to wipe off that wax marker and other bits of grime. I tried rubbing alcohol but all that did was wipe off the paint that I was not told was water soluble. xx(
IIRC, the official Apple name for the font used pre-Mac was Cupertino. Came on at least System 6.0.8, and probably on 7.x as well.
Re: the wax markings, gotta love Shop 'n Save for doing that. Still have to clean the other DuoDisk and some other items that happen to have those markings on them.
Anyway, good deal.
-J
Re: the wax markings, gotta love Shop 'n Save for doing that. Still have to clean the other DuoDisk and some other items that happen to have those markings on them.
Anyway, good deal.
-J
Finally completed mounting everything inside. Unit looks good, sounds good and now for burn-in.
Already I'm running into troubles.
Cabling wise my 50 pin do D-sub 25 adapter is good with no breaks. It was wired from this daigram:

However even with a terminator fitted between the internal cable and the drive no system can detect it.
I pulled the harness out of a Sun 411 enclosure and tried that to ensure it was the cable. Sure enough even without a terminator I had computers detecting it. :?:
Second problem is a bit more fatal. The drive either needs a LLF pretty badly or the HDA has failed. So the moment you poke at it it starts to constantly reseek with the odd moment it actually reads or writes.
Edited: I managed to format the drive. Windows was being cranky so I pulled out the Mainstreet and tried it instead. It formatted and mounted after selecting the low-level format option. After I do another format with HD SC setup (Unlike Drive Setup, HD SC setup will fail a drive at even the slightest hint of a problem) I'll throw Snooper's looped disk testing at it and see what happens in a few hours.
Okay, so back to problem #1 again. The cable.
electricially it's intact but something isn't getting across. Any trimmed ground lines seen are still getting grounded at the drive. There's at least four ground lines that are linked directly from the host system to the drive. Pin 1 is shield ground for the connector. The only difference between the cable I made that does not work and the Sun cable is that does work is that the Sun cable has all the lines cut up and fed through a toroidal ring and indead of a D-sub 25 connector it has an HD50 connector. The internal cabling is also about three inches shorter.
If I remove my cable from the bulkhead and try to rest it in a manner that it's far from the AC line and the power supply I don't have any change.
Already I'm running into troubles.
Cabling wise my 50 pin do D-sub 25 adapter is good with no breaks. It was wired from this daigram:
However even with a terminator fitted between the internal cable and the drive no system can detect it.
I pulled the harness out of a Sun 411 enclosure and tried that to ensure it was the cable. Sure enough even without a terminator I had computers detecting it. :?:
Second problem is a bit more fatal. The drive either needs a LLF pretty badly or the HDA has failed. So the moment you poke at it it starts to constantly reseek with the odd moment it actually reads or writes.
Edited: I managed to format the drive. Windows was being cranky so I pulled out the Mainstreet and tried it instead. It formatted and mounted after selecting the low-level format option. After I do another format with HD SC setup (Unlike Drive Setup, HD SC setup will fail a drive at even the slightest hint of a problem) I'll throw Snooper's looped disk testing at it and see what happens in a few hours.
Okay, so back to problem #1 again. The cable.
electricially it's intact but something isn't getting across. Any trimmed ground lines seen are still getting grounded at the drive. There's at least four ground lines that are linked directly from the host system to the drive. Pin 1 is shield ground for the connector. The only difference between the cable I made that does not work and the Sun cable is that does work is that the Sun cable has all the lines cut up and fed through a toroidal ring and indead of a D-sub 25 connector it has an HD50 connector. The internal cabling is also about three inches shorter.
If I remove my cable from the bulkhead and try to rest it in a manner that it's far from the AC line and the power supply I don't have any change.
The drive still makes the suspicious sound like it's repeating seeks and through Drive Setup at least it will fail to partition and format for the ProDOS file system (We'll see it the Apple II utility fairs better) but otherwise the drive is performing flawlessly. I'll leave it at that.
As for the cabling I pulled out another SCSI enclosure that had a factory made variant to the cable I made. That one works so tomorrow I'll reverse engineer that one and see what changed.
As for the cabling I pulled out another SCSI enclosure that had a factory made variant to the cable I made. That one works so tomorrow I'll reverse engineer that one and see what changed.
VERY project results, comrade.
How's the marker/grime removal going? If the spray paint is acrylic/latex, try a water wet cloth with a little bit of turpentine, that's how I used to remove Stabillo grease pencil layout line residue off a ll kinds of paint in the shop. Sometimes Pledge or the like works wonders for removing grime.
A little nose grease wiped with a clean rag rarely hurts and ofttimes helps as well. ;D
project results, comrade.How's the marker/grime removal going? If the spray paint is acrylic/latex, try a water wet cloth with a little bit of turpentine, that's how I used to remove Stabillo grease pencil layout line residue off a ll kinds of paint in the shop. Sometimes Pledge or the like works wonders for removing grime.
A little nose grease wiped with a clean rag rarely hurts and ofttimes helps as well. ;D
Here's my "It's 2:30 AM and I want to go to f*#% to sleep so I hope after four goofed repins THIS one better f@ing work" replacement SCSI cable.
Turns out I was pinning it completely wrong and for got to account that the way the ribbon cable crimps interleaves pins in a 1, 14, 2, 15, 3, 16 etc fashion.

Amazingly it did work so now the unit is...
COMPLETE
Ladies and gentlemen, I give you the AppleFile. The worlds first SCSI hard disk, exclusively for the Apple IIe line of personal computers.


Turns out I was pinning it completely wrong and for got to account that the way the ribbon cable crimps interleaves pins in a 1, 14, 2, 15, 3, 16 etc fashion.
Amazingly it did work so now the unit is...
COMPLETE
Ladies and gentlemen, I give you the AppleFile. The worlds first SCSI hard disk, exclusively for the Apple IIe line of personal computers.