

Thread
PowerBook Duo battery replacement
I don't have a variable voltage variable current power supply to do this. The current will have to be done manually along with a current/time slope to cap them off.
Still, I have little faith in the ability of a couple of cells to withstand 16 years of abuse.
Where is Waldo?
Waldo being the code-name for a "dBook" hack featuring a non-inter-changeable, internal, WORKING, inexpensive AA battery pack . . .
. . . that'll charge just fine from the Duo's MoBo BatPack rails . . .
. . . once they're hijacked to the HDD Bay, that is. }
. . . oh! Don't forget the silent aspect of the Waldo™ hack. Yes it fits . . .
. . . and it can be upgraded to an SD/Chiplet as 1.8" IDE HDD! :approve:
edit: forgot to mention the provision for a Disk Access LED hack on this particular board
Lets not forget that the Battery Pack will hold a 2.5" SCSI SSD and it shouldn't be at all difficult to hack a connector to make it removable!

Waldo being the code-name for a "dBook" hack featuring a non-inter-changeable, internal, WORKING, inexpensive AA battery pack . . .
. . . that'll charge just fine from the Duo's MoBo BatPack rails . . .
. . . once they're hijacked to the HDD Bay, that is. }
. . . oh! Don't forget the silent aspect of the Waldo™ hack. Yes it fits . . .
. . . and it can be upgraded to an SD/Chiplet as 1.8" IDE HDD! :approve:
edit: forgot to mention the provision for a Disk Access LED hack on this particular board
Lets not forget that the Battery Pack will hold a 2.5" SCSI SSD and it shouldn't be at all difficult to hack a connector to make it removable!
Now that ^ would be a useful hack.
We should give these ideas to Apple, and they should make the Duo just for us all over again. Better this time: but still a 100MHz 603e CPU. This time they do it right: Built-in WiFi and Ethernet (we don't need no stinking 14.4Kbps modem), lithium ion battery that slides in and out like a CF card, CF device for a hard drive, ...and of course it will have a trackball with optical tracking instead of wheels.
Actually, given the way the Raspberry Pi was pushing 1080p video, I'm not quite sure there are such things as excuses not to do it...I mean that thing has dual USB, Ethernet, HDMI, sound out, and a cheap price tag. That has a recipe for a SuperDuoHack.
As far as the batteries go, I just have to order some 2/3rds A batteries and a CMOS battery, or tear apart the one I have and see if it's possible to not spend 40$ on some coin cell battery with tabs soldered on with protective wrapping and some wires.
We should give these ideas to Apple, and they should make the Duo just for us all over again. Better this time: but still a 100MHz 603e CPU. This time they do it right: Built-in WiFi and Ethernet (we don't need no stinking 14.4Kbps modem), lithium ion battery that slides in and out like a CF card, CF device for a hard drive, ...and of course it will have a trackball with optical tracking instead of wheels.
Actually, given the way the Raspberry Pi was pushing 1080p video, I'm not quite sure there are such things as excuses not to do it...I mean that thing has dual USB, Ethernet, HDMI, sound out, and a cheap price tag. That has a recipe for a SuperDuoHack.
As far as the batteries go, I just have to order some 2/3rds A batteries and a CMOS battery, or tear apart the one I have and see if it's possible to not spend 40$ on some coin cell battery with tabs soldered on with protective wrapping and some wires.
I've got two more configurations to document:
1) Ten AA Cells will fit into the Battery Compartment just fine
___Micro-ENSC in right side of HDD Bay w/SCSI Cable + Adapter from internal 2300c SCSI Connector
___Same HDD replacement scheme with Micro PCI-e IDE SSD in between TrackBall and ENSC
___De-soldered RJ-45 replaced with wires leading to same mounted to the Power Board in the MoDem Bay
2) Seventeen AAA Cells in between TrackBall and Micro-ENSC, the other three AAAs in the excess Modem Bay Cubic
___Micro PCI-e IDE SSD will probably fit on top of the hacked Micro-ENSC [ ] ]'>
] ]'>
. . . in either hack, four holes drilled in the right edge top plate will expose the four activity LEDs of the NIC! :approve:
BTW, Hacked AA Battery holders will alleviate the need for tabs, spot welding/soldering and make re-celling a snap!
pics to follow! }
p.s. I've got the skeleton of another 2300cTB up and running! [] ]'>
p.p.s. Got Torx? :?:
1) Ten AA Cells will fit into the Battery Compartment just fine
___Micro-ENSC in right side of HDD Bay w/SCSI Cable + Adapter from internal 2300c SCSI Connector
___Same HDD replacement scheme with Micro PCI-e IDE SSD in between TrackBall and ENSC
___De-soldered RJ-45 replaced with wires leading to same mounted to the Power Board in the MoDem Bay
2) Seventeen AAA Cells in between TrackBall and Micro-ENSC, the other three AAAs in the excess Modem Bay Cubic
___Micro PCI-e IDE SSD will probably fit on top of the hacked Micro-ENSC [
] ]'>. . . in either hack, four holes drilled in the right edge top plate will expose the four activity LEDs of the NIC! :approve:
BTW, Hacked AA Battery holders will alleviate the need for tabs, spot welding/soldering and make re-celling a snap!
pics to follow! }
p.s. I've got the skeleton of another 2300cTB up and running! [
] ]'>p.p.s. Got Torx? :?:
Those stock cells look extremely close to the Sanyo NiMH batteries used for the newton rechargable battery packs. Wish I had a link to where I bought my cells from, but I lost the link a long time ago.
Has anybody made headway on this?
I personally haven't, but I'd like to start when the Hobby Fund has been replenished, likely with the timing of a certain government tax time...(assuming they don't give us all IOUs like last year (or was it 2 years ago?)).
I was checking on Amazon if they had any single 1600MAh 2/3A cells, and found this. I thought "Hey, I could just put two of those packs together (get the dimensions first) in series, and there's my 12v at 1600MAh each!"
Worst case scenario, they're still 1600MAh 2/3A cells, 5 a pack, and you'll know they have solder tabs on them, so....yeah. Just looking at the way the factory made the Duo cells with cryptic wiring paths and nonexistent polarities makes me cringe a bit.
I personally haven't, but I'd like to start when the Hobby Fund has been replenished, likely with the timing of a certain government tax time...(assuming they don't give us all IOUs like last year (or was it 2 years ago?)).
I was checking on Amazon if they had any single 1600MAh 2/3A cells, and found this. I thought "Hey, I could just put two of those packs together (get the dimensions first) in series, and there's my 12v at 1600MAh each!"
Worst case scenario, they're still 1600MAh 2/3A cells, 5 a pack, and you'll know they have solder tabs on them, so....yeah. Just looking at the way the factory made the Duo cells with cryptic wiring paths and nonexistent polarities makes me cringe a bit.
Those packs look VERY interesting! :b&w:
Hmm well, going from the dimensions of bare 2/3A cells from your previous link:
Height : 28mm (1.10")
Diameter : 17mm (0.67")
Each pack has to be a minimum of:
Width: 17mm x 2 cells = 34mm x 2 packs = 68mm
Height: 17mm
Length: 28mm + 28mm + 17mm = 73mm
From my previous adding-up of the Duo pack as it came from the factory:
No problem
You've got a full 15-25mm to play with in either direction.
Inside dimension (widest): 79.5mm
Inside dimension (width inside pocket for catch mechanism): 64mm
Inside dimension (length): 103mm
Plenty of room. The are some ribs inside that could either be worked around or sanded down. Either way the smaller size gives us some room, the 1.6Ah matches the original, nobody has to some fancy rewiring of a circuit that we know little about since there are no + or - marks on the originals, and I think that is what I will do. I'll probably stuff the insides with foam and glue the packs down on the edges to the base so a little heat and the packs come back out easily. Probably will superglue the battery pack itself together.
Inside dimension (width inside pocket for catch mechanism): 64mm
Inside dimension (length): 103mm
Plenty of room. The are some ribs inside that could either be worked around or sanded down. Either way the smaller size gives us some room, the 1.6Ah matches the original, nobody has to some fancy rewiring of a circuit that we know little about since there are no + or - marks on the originals, and I think that is what I will do. I'll probably stuff the insides with foam and glue the packs down on the edges to the base so a little heat and the packs come back out easily. Probably will superglue the battery pack itself together.
Hopefully soon I'll get my tax refund back soon...
In the meantime, I need to start working on acquiring the parts list for my SUPERPOWERDUOTB2. Since I have problems with 7.6.1 and 8.1 on the hard drive and MacTest Pro PPC reports hard drive problems, I think that is an excellent motivator for me to get that 44 pin IDE to CF adaptor. Fortunately, unlike SCSI to IDE adaptors, they are DIRT cheap.
Back to the topic at hand: batteries. We need to be very sure of the battery pack dimensions so that TWO of them will fit inside the Duo's tiny battery pack. This gave me the dimensions: 83mm long x 31mm wide x 17mm high.
So two of those packs would occupy a square area of 83mm by 62mm. The internal ribs will have to be removed by sanding so the packs will all fit. How convenient of them to include wires that mean my lackluster "Ehhhhh" soldering abilities won't get a chance to get too excited. All I'd have to do is intertwist the wires into a series connection, figure out the correct polarity, solder the wires together, put wire caps (or crimp them, which is what I'll probably do), wrap the connection in durable tape, put buffer material inside the battery, reapply glue to the case halves, stuff the packs in there and wait about two days.
Those of you looking to tear up a Duo and "rearrange things better than Apple did" can look at non-chuck batteries. I used to be into Airsoft. (It's not softair, its airsoft.) Non-chuck batteries were used for AEGs (Automatic Electric Guns) that had retracting or folding stocks: with folding stocks like the MP5A3, the battery would go in the front forearm, in folding stock models it might also go in the front forearm OR it might be a special "crane" configuration that fits inside a "crane" stock (kinda like a cross between a full stock and a skeleton stock, aka the SIG 552).
In the meantime, I need to start working on acquiring the parts list for my SUPERPOWERDUOTB2. Since I have problems with 7.6.1 and 8.1 on the hard drive and MacTest Pro PPC reports hard drive problems, I think that is an excellent motivator for me to get that 44 pin IDE to CF adaptor. Fortunately, unlike SCSI to IDE adaptors, they are DIRT cheap.
Back to the topic at hand: batteries. We need to be very sure of the battery pack dimensions so that TWO of them will fit inside the Duo's tiny battery pack. This gave me the dimensions: 83mm long x 31mm wide x 17mm high.
So two of those packs would occupy a square area of 83mm by 62mm. The internal ribs will have to be removed by sanding so the packs will all fit. How convenient of them to include wires that mean my lackluster "Ehhhhh" soldering abilities won't get a chance to get too excited. All I'd have to do is intertwist the wires into a series connection, figure out the correct polarity, solder the wires together, put wire caps (or crimp them, which is what I'll probably do), wrap the connection in durable tape, put buffer material inside the battery, reapply glue to the case halves, stuff the packs in there and wait about two days.
Those of you looking to tear up a Duo and "rearrange things better than Apple did" can look at non-chuck batteries. I used to be into Airsoft. (It's not softair, its airsoft.) Non-chuck batteries were used for AEGs (Automatic Electric Guns) that had retracting or folding stocks: with folding stocks like the MP5A3, the battery would go in the front forearm, in folding stock models it might also go in the front forearm OR it might be a special "crane" configuration that fits inside a "crane" stock (kinda like a cross between a full stock and a skeleton stock, aka the SIG 552).
Let us know how the formatting goes, I've got a couple of those adapters, but haven't had time to try 'em out since finding all mu utility software . . .
. . . prolly lost it again by now! :
Those PaintBall BatPacks look very interesting, they're on my watch list now. But you'd need to hack up three of them to get two bats with one cell left over. Hacking up just two to get one BatPack with four cells left over seems kinda silly . . .
. . . prolly lost it again by now! :
Those PaintBall BatPacks look very interesting, they're on my watch list now. But you'd need to hack up three of them to get two bats with one cell left over. Hacking up just two to get one BatPack with four cells left over seems kinda silly . . .
You're probably right. The low range of an AEG is 7.2V, and that's just crawling along. Most are 8.4V, typically, and run just fine on it. Some folks (particularly in the UK, which implemented a ban on airsoft guns with power greater than 1 Joule, or about 328FPS with a .20g BB) turn to a high rate of fire, so that leans them in the area of 9.6V and even 10.8V. (This also means they eat gearboxes faster)
This means that my quick search for a 6v non-chuck is in vain: because nobody uses that voltage for that purpose. I doubt it would have the voltage to cycle the piston properly from full-forward to full-backward. The way AEGs work is that the piston must come all the way back against the spring, that's when a certain gear that has about 2/3 of its teeth missing releases its tension against the piston, and POOSH the spring pushes the spring forward. Apparently those battery packs are also used by the RC car community, and guess who else? Us!!
But we don't talk AEGs on 68kmla. :lol:
I'm doing some research now on the idea CF adaptor and the right card. Clearly, it must support UDMA and fixed-disk mode. And be fast.
This means that my quick search for a 6v non-chuck is in vain: because nobody uses that voltage for that purpose. I doubt it would have the voltage to cycle the piston properly from full-forward to full-backward. The way AEGs work is that the piston must come all the way back against the spring, that's when a certain gear that has about 2/3 of its teeth missing releases its tension against the piston, and POOSH the spring pushes the spring forward. Apparently those battery packs are also used by the RC car community, and guess who else? Us!!
But we don't talk AEGs on 68kmla. :lol:
I'm doing some research now on the idea CF adaptor and the right card. Clearly, it must support UDMA and fixed-disk mode. And be fast.
Five pages of yakkin' about a Duo battery rebuild, but nobody actually did it? OK, I will accept this challenge!
I ordered a 12-pack of AAA 1000 mAh rechargeables here. That gives me two spares. I ordered 4 AAA 2-cell battery holders here. Total cost is $16.32.
Four AAA 2-cell holders will fit easily inside the old battery case, for a total of eight batteries. The last two AAA batteries must go end-to-end below the battery holders, so I'll have to build something custom for that.
It should be possible to do this by soldering the holders, without soldering anything to the batteries themselves. Then when these cells die in a few years, I can just pop in new AAA rechargeables from the grocery store, instead of worrying about 4/5 AA cells and solder tabs. I'll post photos in a couple of days, once all the parts are here.
OK, I will accept this challenge!I ordered a 12-pack of AAA 1000 mAh rechargeables here. That gives me two spares. I ordered 4 AAA 2-cell battery holders here. Total cost is $16.32.
Four AAA 2-cell holders will fit easily inside the old battery case, for a total of eight batteries. The last two AAA batteries must go end-to-end below the battery holders, so I'll have to build something custom for that.
It should be possible to do this by soldering the holders, without soldering anything to the batteries themselves. Then when these cells die in a few years, I can just pop in new AAA rechargeables from the grocery store, instead of worrying about 4/5 AA cells and solder tabs. I'll post photos in a couple of days, once all the parts are here.
That, I am convinced, is the way to rebuild these batteries (though alternatively, you could buy pre-built battery packs with the full-sized cells from china and solder them and the fuse etc. together via the leads).
Soldering tabbed cells without specialist equipment just ruins them long-term. I have seen this in a rebuilt Duo battery (which I have done), and in a 540c battery (which I have done).
I haven't tried it the way you've outlined, but I have been thinking about it for a year or more. Let us know how you get on with it. An AAA NiMh today has about the same capacity as the original cells, so everything should be good.
Soldering tabbed cells without specialist equipment just ruins them long-term. I have seen this in a rebuilt Duo battery (which I have done), and in a 540c battery (which I have done).
I haven't tried it the way you've outlined, but I have been thinking about it for a year or more. Let us know how you get on with it. An AAA NiMh today has about the same capacity as the original cells, so everything should be good.
Of the threads that came up when I searched the archives, this was the only one with any really good info:
Duo battery won't charge
I didn't take note of which had the advice, but it was to:
Search here and over on 'fritter for "recell"
Too tired to search any more tonight, maybe in the AM.
It's good of you to take this on, Big.
Duo battery won't charge
I didn't take note of which had the advice, but it was to:
Search here and over on 'fritter for "recell"
Too tired to search any more tonight, maybe in the AM.
It's good of you to take this on, Big.
I found a few good descriptions of Duo battery rebuilds, especially this one. I haven't seen any that used AAA's to do it, but like beachycove said, modern AAA's are very similar to the original battery cells (just much smaller and easier to work with). I'm not really sure why I'm doing this - it's not like I have a burning need to run a 20-year-old Duo for three hours on a plane flight - but it should be interesting!
What about the charging circuitry in the PowerBook? Is it compatible with the modern AAA cells? For that matter, is the chemistry of the AAA cells equivalent to that of the original ones (NiCd or NiMH)?
c
c
I'd say positively, good buddy, or big wouldn't be seriously considering it.
@ big: I've got a high capacity bat charging chippie from an extended depth BTI batpack for you to play with if you can find high capacity AAA cells. [] ]'>
@ big: I've got a high capacity bat charging chippie from an extended depth BTI batpack for you to play with if you can find high capacity AAA cells. [
] ]'>
Well, that little "transistor" in the battery pack is actually the ID chip. That chip tells the machine what the battery capacity is. This allows the charge controller to charge the batteries properly with a set of known calculated formulas based off of capacity, such as 1C, or 1/C. The temperature sensor tells the PMU to kill the charging DC/DC when it reaches above a certain threshold as it thinks the batteries are now over charged. Overcharged NiMH/NiCd burns off excess capacity being dumped into it as heat.
If you use a cell capacity thats different than the originals, you need to dump the 2-wire EEPROM and modify the contents to the new capacity, generate a new checksum and reprogram it. Sometimes they are 1 time write, and in this case replace it with a new dallas/maxim part.
If you use a cell capacity thats different than the originals, you need to dump the 2-wire EEPROM and modify the contents to the new capacity, generate a new checksum and reprogram it. Sometimes they are 1 time write, and in this case replace it with a new dallas/maxim part.
I just searched the forums, forum archives and iFrog. I don't seem to have ever taken pics of the innards of my High Capacity BTI Battery or the little chip on the PCB inside it. This is an intelligent battery because the chip is a PIC16C54. I'll definitely do so tonight cuz I just came up with what I think might be a doozie.
I drilled the spring out of a corroded battery holder, It fits perfectly between a pair of AA Batteries, five columns of which line up front to back in this extended front case battery. All I need do is glue brass tabs on the side edges of the case to connect the rows of columns in series and I'm all set.
Dunno, maybe that trick might come in handy for your setup, big?
Pics coming up forthwith! [] ]'>
I drilled the spring out of a corroded battery holder, It fits perfectly between a pair of AA Batteries, five columns of which line up front to back in this extended front case battery. All I need do is glue brass tabs on the side edges of the case to connect the rows of columns in series and I'm all set.
Dunno, maybe that trick might come in handy for your setup, big?
Pics coming up forthwith! [
] ]'>Do you know this from experience, or is it an educated guess? I'd be happy to be proven wrong, but I'm betting the Powerbook Duo charging circuit is a typical delta-v design (http://en.wikipedia.org/wiki/Battery_charger#Intelligent) that looks for a small voltage dip to detect when the batteries are fully charged. This method works with any NiCad or NiMH battery. With a delta-v, the charger doesn't need to know the capacity of the battery. I think the temperature sensor is just there as a safety measure. I've never seen a battery charger that used a temperature sensor to decide when to stop charging, as that wouldn't be very precise. I assume the ID chip is used to determine the optimal charging rate, like you said, but I don't think it's critical that it match the actual battery capacity. If your rebuilt battery uses higher capacity cells than the original, the worst that would happen with the wrong ID chip is that it would charge at a lower than optimal current, and take longer to reach full charge. Or maybe the ID chip is just an anti-battery-conterfeiting measure, and has nothing to do with the charging rate at all.
Anyway these are just my educated guesses, but I feel confident enough in them to risk my Duo and new AAA cells on it. If it all bursts into flames, at least it'll make a good learning experience!
Interesting - so you've probably got space in there for 10 AAs instead of 10 AAAs, if you want to do a rebuild using that battery case.
Nap! I don't see why you can't do 5x2 AA in a standard Duo bat case with this method. [] ]'>
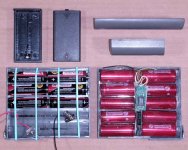
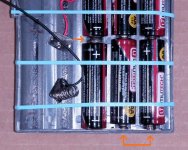
The crusty original spring (single arrow) went sproioioinnnnggggg!!!!!!!! right out of the pack along with one of the two bats. Murphy had my back this time however! When I couldn't find that annoying coil of wire, I opened up the cute little 2 x AA case I'dd snagged at CrapShack a few months ago. It has the P_E_R_F_E_C_T doohickies inside for a nice clean hack using the connector plate/spring assemblies from _x_ of them and the end caps from a minimum of one of them. More ends and less column connectors if you need to stick active components in series betwixt columns of cells.
Dunno haven't checked out the plumbing yet. One thing is sure, I'm gonna need to hammer the positive terminal teats on the spring/plate assembly flat as a pancake. Trimming a bit of the sproinnggggyyyyyy part back might be helpful as well. The fit is wonderfully tight and there's enough space left between the columns of cells in my pack to make me think this can be done in a standard Duo Bat Case. I lined five cells up and it looks hunky dunky from the outside. The widths of the bats are the same, obviously. Anybody got an open Duo Bat to line up AA cells inside like I've done in mine?
The mysterious BTI goodies hidden within:
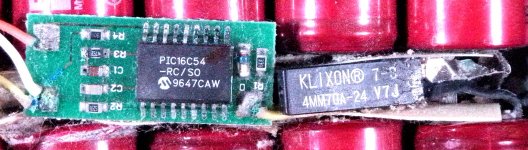
Looks like just traces on the PCB flip side, mo-n-betta pics if you so desire, Mr. big.
I'd love to get this gunky junk into the hands of someone competent before I have a chance to barbecue it, now that it's been marinating in acid, lo these many years.
BTI is still around, if such a competent person were to approach them, information might be forthcoming . . .
. . . like the freakin' missing power specs on these %({*@]*%^&+$^ Panosonic NiMH things! :
Other stuff too if a competent comrade were to get in touch with an oldtimer engineer over there. I got no chance of pulling that off a-tall!
] ]'>The crusty original spring (single arrow) went sproioioinnnnggggg!!!!!!!! right out of the pack along with one of the two bats. Murphy had my back this time however! When I couldn't find that annoying coil of wire, I opened up the cute little 2 x AA case I'dd snagged at CrapShack a few months ago. It has the P_E_R_F_E_C_T doohickies inside for a nice clean hack using the connector plate/spring assemblies from _x_ of them and the end caps from a minimum of one of them. More ends and less column connectors if you need to stick active components in series betwixt columns of cells.
Dunno haven't checked out the plumbing yet. One thing is sure, I'm gonna need to hammer the positive terminal teats on the spring/plate assembly flat as a pancake. Trimming a bit of the sproinnggggyyyyyy part back might be helpful as well. The fit is wonderfully tight and there's enough space left between the columns of cells in my pack to make me think this can be done in a standard Duo Bat Case. I lined five cells up and it looks hunky dunky from the outside. The widths of the bats are the same, obviously. Anybody got an open Duo Bat to line up AA cells inside like I've done in mine?
The mysterious BTI goodies hidden within:
Looks like just traces on the PCB flip side, mo-n-betta pics if you so desire, Mr. big.
I'd love to get this gunky junk into the hands of someone competent before I have a chance to barbecue it, now that it's been marinating in acid, lo these many years.
BTI is still around, if such a competent person were to approach them, information might be forthcoming . . .
. . . like the freakin' missing power specs on these %({*@]*%^&+$^ Panosonic NiMH things! :
Other stuff too if a competent comrade were to get in touch with an oldtimer engineer over there. I got no chance of pulling that off a-tall!
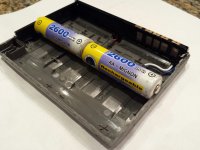
Here's my standard Duo battery case, with two rechargeable AA's laid end to end inside it. You can see the case is about 1 mm too short before you even start thinking about spring terminals. The button on the positive terminal of the AA is actually poking out the edge of the case. The "floorplan" of grooves on the standard battery case is also different: it has grooves for six batteries going vertically, and two horizontal on top and two more horizontal on bottom. So even if it were long enough, I don't think you could lay down a 5 x 2 pattern of AA's without some Dremel work.
That BTI battery is neat, but is there anything about the NiMH cells we don't already know? The original Duo batteries are just 10 regular NiMH rechargeables in the 1000 - 1800 mAh range, depending on what type of battery you have. The Mac shouldn't need to know or care whether those are AA, 4/5 AA, AAA, or some other shape as long as they're compatible electrically.BTI is still around, if such a competent person were to approach them, information might be forthcoming . . . . . . like the freakin' missing power specs on these %({*@]*%^&+$^ Panosonic NiMH things! :
The cells in the BTI are way too high capacity to charge (safely/at all?) in the Duo without that micro-controller based intelligent circuitry.
Measure again! Those rechargeable cells of yours must be oversize?
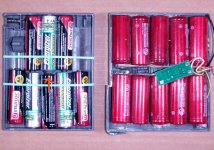
I swear to Finagle I can trim that latch back a bit on the sides, excise the spring spindle, carve away the box supports, stick a freakin' Gummi Bear between latch and outboard cell and be good to go! [}] ]'>
BTW: if you've been organizing and condensing your crap into fewer and smaller containers,
you likely won't be able to lay hands upon that blasted dead-blow hammer . . .
. . . so lay the bat on the carpet and beat the freakin' snot out of that little gray sucker with a Big@$$ Rubber Mallet . . .
. . . works a charm! :approve:
Measure again! Those rechargeable cells of yours must be oversize?
I swear to Finagle I can trim that latch back a bit on the sides, excise the spring spindle, carve away the box supports, stick a freakin' Gummi Bear between latch and outboard cell and be good to go! [}
] ]'>BTW: if you've been organizing and condensing your crap into fewer and smaller containers,
you likely won't be able to lay hands upon that blasted dead-blow hammer . . .
. . . so lay the bat on the carpet and beat the freakin' snot out of that little gray sucker with a Big@$$ Rubber Mallet . . .
. . . works a charm! :approve:
Could be, But after repairing lots of circuitry in various things over the years, it could be anything. It could be DV, but it could be 1C. But I know for a fact i am right about the PROM in the unit, contains battery model, serial, and capacity.Do you know this from experience, or is it an educated guess? I'd be happy to be proven wrong, but I'm betting the Powerbook Duo charging circuit is a typical delta-v design (http://en.wikipedia.org/wiki/Battery_charger#Intelligent) that looks for a small voltage dip to detect when the batteries are fully charged. This method works with any NiCad or NiMH battery. With a delta-v, the charger doesn't need to know the capacity of the battery. I think the temperature sensor is just there as a safety measure. I've never seen a battery charger that used a temperature sensor to decide when to stop charging, as that wouldn't be very precise. I assume the ID chip is used to determine the optimal charging rate, like you said, but I don't think it's critical that it match the actual battery capacity. If your rebuilt battery uses higher capacity cells than the original, the worst that would happen with the wrong ID chip is that it would charge at a lower than optimal current, and take longer to reach full charge. Or maybe the ID chip is just an anti-battery-conterfeiting measure, and has nothing to do with the charging rate at all.
Anyway these are just my educated guesses, but I feel confident enough in them to risk my Duo and new AAA cells on it. If it all bursts into flames, at least it'll make a good learning experience!
I dont know its exact capacity or part number off-hand, but its in this family:
http://www.maximintegrated.com/datasheet/index.mvp/id/4272
you can write some code in an arduino or AVR equivalent and read out that IC. Then you can make your necessary modifications if you like. For example, ID tag it bigmessowires battery of DOOM.
You guys rock!you can write some code in an arduino or AVR equivalent and read out that IC. Then you can make your necessary modifications if you like. For example, ID tag it bigmessowires battery of DOOM.Anyway these are just my educated guesses, but I feel confident enough in them to risk my Duo and new AAA cells on it. If it all bursts into flames, at least it'll make a good learning experience!

There's another possibility here:
IIRC, you could use the higher capacity Kanga (LIon?) batteries in the 3400 (LIon) but you needed to charge them externally in a Kanga charger with a Kanga AC adapter . . . either that or it was using the 3400 LIon batteries in the 5300, etc. . . .
. . . dunno, no coffee yet. |)
Point being, we could try the off the shelf, 2450mAh NiMh cells in the Pics I took of the 2x5 AA config in the standard Duo Battery Pack.
Finding/building an appropriate charger to handle them packed in series wcould be a problem, but there must be a lot of 12V chargers around that would work. building the contact setup to disallow internal charging without the Power Manager throwing a hissy fit might be a major problem, but I'd think a simple circuit in the battery would work out. Might not be any problem at all, so long as the Duo can't stat trying to charge the FrankenPack when you inevitably forget to remove it to run the Duo of its wall wart, lever it onto a MiniDock/UltraDock plugged in likewise or BZZZERT it into a DuoDock.
Just gotta find a better material for the Gummi spring, the Bears prolly' tend to stickiness a/o catastrophic meltdown.
< . . . wonders about the conductivity/resistance value of Gummi Bears? >
Duo charging bases went for peanuts, the last time I checked anyway. Dunno what's in 'em, but a singly battery charger ought to be a simple fab.
IIRC, you could use the higher capacity Kanga (LIon?) batteries in the 3400 (LIon) but you needed to charge them externally in a Kanga charger with a Kanga AC adapter . . . either that or it was using the 3400 LIon batteries in the 5300, etc. . . .
. . . dunno, no coffee yet. |)
Point being, we could try the off the shelf, 2450mAh NiMh cells in the Pics I took of the 2x5 AA config in the standard Duo Battery Pack.
Finding/building an appropriate charger to handle them packed in series wcould be a problem, but there must be a lot of 12V chargers around that would work. building the contact setup to disallow internal charging without the Power Manager throwing a hissy fit might be a major problem, but I'd think a simple circuit in the battery would work out. Might not be any problem at all, so long as the Duo can't stat trying to charge the FrankenPack when you inevitably forget to remove it to run the Duo of its wall wart, lever it onto a MiniDock/UltraDock plugged in likewise or BZZZERT it into a DuoDock.
Just gotta find a better material for the Gummi spring, the Bears prolly' tend to stickiness a/o catastrophic meltdown.
< . . . wonders about the conductivity/resistance value of Gummi Bears? >
Duo charging bases went for peanuts, the last time I checked anyway. Dunno what's in 'em, but a singly battery charger ought to be a simple fab.
I'm gonna let you guys figure out the black magic, I can no longer afford to spend the time required to buy a clue about electronics.
Meanwhile, I think I'm gonna have a go at the hardware side of things. There's plenty of room to install a hinge of some sort (duct tape will do for prototyping) at the back inside (outside application of a strip of duct tape might work better) of the standard Duo battery pack. I'll be using the retaining slide as the latching mechanism for the front of the FrankenPack.
From this pic you can see the details of the spring/contact plate from the fully enclosed CrapShack battery pack. the positive side bumper is the same thickness as the fully compressed spring on the negative side.
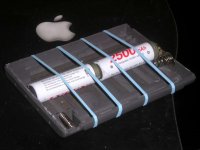
The best bet for this hack will be drilling the spring out of the negative side for the mid-mount config. Doing it that way allows for the connection plate to be mounted backwards so the hump that was to be hammered flat in the original concept becomes a receptacle for the battery's positive terminal.
A minor amount of Dremel work creates five recesses in the sides of the battery pack for the humps-turned-receptacles to significantly increase the effective inside dimensions of the FrankenPack.
The one negative of the stock parts cannibalized from the CrapShack pack is thus transformed to a positive for this configuration.
Once the FrankenPack is inserted into the Duo, all stress on the Duct tape hinge and the front slide/latch is relieved by the tight embrace of the Duo's battery compartment.
My only serious question is the discharge cycle characteristics of off the shelf NiMH cells as opposed to the cells you've sourced, big.
Silly(?) question: given the center spring hack, wouldn't tabbed AA cells work well for a simplified version of the FrankenPack? The tabs would be the connector plates on the ends and the folded over tabs in the center with the spring would ensure good contact every which way I'd think.
No soldering or Dremel work required! ;D
p.s. forgot to mention this: by using off the shelf cells, the FrankenPack disassembles and reassembles easily enough to just use the four position, off the shelf charger five times to refill the FrankenPack and stick a full set of spares into any handy container.
Meanwhile, I think I'm gonna have a go at the hardware side of things. There's plenty of room to install a hinge of some sort (duct tape will do for prototyping) at the back inside (outside application of a strip of duct tape might work better) of the standard Duo battery pack. I'll be using the retaining slide as the latching mechanism for the front of the FrankenPack.
From this pic you can see the details of the spring/contact plate from the fully enclosed CrapShack battery pack. the positive side bumper is the same thickness as the fully compressed spring on the negative side.
The best bet for this hack will be drilling the spring out of the negative side for the mid-mount config. Doing it that way allows for the connection plate to be mounted backwards so the hump that was to be hammered flat in the original concept becomes a receptacle for the battery's positive terminal.
A minor amount of Dremel work creates five recesses in the sides of the battery pack for the humps-turned-receptacles to significantly increase the effective inside dimensions of the FrankenPack.
The one negative of the stock parts cannibalized from the CrapShack pack is thus transformed to a positive for this configuration.
Once the FrankenPack is inserted into the Duo, all stress on the Duct tape hinge and the front slide/latch is relieved by the tight embrace of the Duo's battery compartment.
My only serious question is the discharge cycle characteristics of off the shelf NiMH cells as opposed to the cells you've sourced, big.
Silly(?) question: given the center spring hack, wouldn't tabbed AA cells work well for a simplified version of the FrankenPack? The tabs would be the connector plates on the ends and the folded over tabs in the center with the spring would ensure good contact every which way I'd think.
No soldering or Dremel work required! ;D
p.s. forgot to mention this: by using off the shelf cells, the FrankenPack disassembles and reassembles easily enough to just use the four position, off the shelf charger five times to refill the FrankenPack and stick a full set of spares into any handy container.