

Thread
Power Mac 9600 O.G. Guide
Introduction:
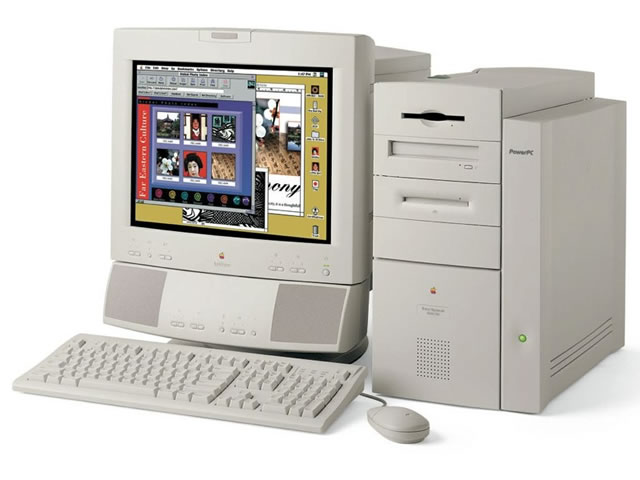
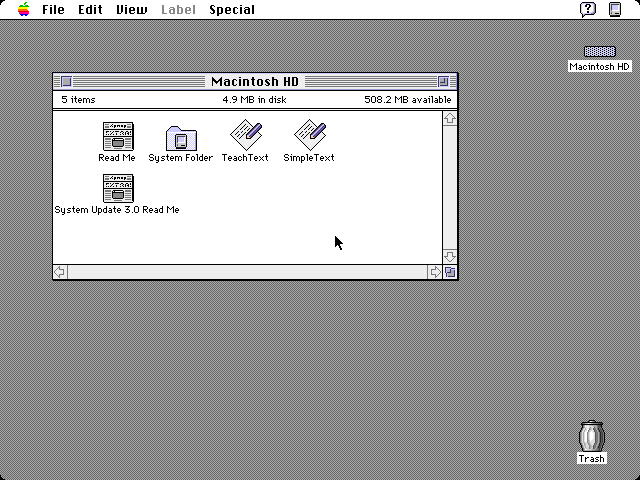
Powermac 9600 machines are the very last Macs to boot System 7 natively, with System 7 originally being programmed to run on 68k machines. The transition to PowerPC processors was made in 1991 with version 7.1.2. The 9600/200 originally shipped with 7.5.5. The latest version of System 7 is 7.6.1 which is the preferred version for a 9600. With the introduction of 7.6, it was there that the Macintosh operating system was first referred to as Mac OS instead of System 7. Regardless of that, I’ll be referring to the OS as System 7 from now on. You can read more about the evolution of System 7 here: https://en.wikipedia.org/wiki/System_7
The 9600 supports up to OS9.1 officially, but it can be ‘helped’ along in installing 9.2.2, as well as OSX via additional software. It’s my advice to leave your 9600 as is and boot to 7.6.1, plus your choice of an OS8/OS9 version for safety reasons. I prefer a combo of 7.6.1 and OS8.6 myself.
I have CPU upgrade information below but it’s my advice to leave your 9600 as stock as possible for many compatibility reasons. If you plan on running VST instruments and VST FX, I’d recommend against using a 9600 altogether. Even if you upgrade the machine with the fastest upgrade ever made for it - the 1ghz Sonnet Crescendo - you will still suffer from the slow system bus speed (50mhz) among other things that slow it down.
9600s are more of specialty machines and they’re best left to do what they excel at:
1) Pro Tools & Sound Designer rigs
2) MIDI machines
3) ADAT & DTRS transfer machines
Basically, if you’re not taking advantage of Digidesign’s TDM power, you’re not going to get very far with one. Leave all VST stuff for G4 machines. If you’ve got hardware recording consoles, hardware synthesizers, and/or digital tape machines, the 9600 will be a good fit for you. Tracking, Editing, and MIDI editing is what these things are about.
One of the best things about a 9600 and running System 7 is the lack of bloat. Every time a new OS or a new version of your favorite software is released, it comes with a lot of new features that are of no use to you. This clutters menus. Worst of all, it usually comes with new, heavy graphics which can bog down your system. Newer operating systems and software make you spend more time menu diving than you do getting any work done.
You’re going to be surprised to see how much more organized your favorite programs were back in System 7 days. Small program file sizes, short menus, uncluttered GUI interfaces... ONLY what you need is provided. System 7 is mostly monochrome and the software that came out for it at the time was mostly monochrome as well. That equates to some really zippy browsing around. Sometimes a white background with black text is all you need to get stuff done. That’s how I prefer it.
RAM:
The 9600 support up to 768mb of ram officially but it’s possible to install up to 1.5GB in the TWELVE slots that are on your board. Each slot will take up to a maximum of a 128mb stick. As mentioned earlier, these machines are used more for specialty purposes so it’s overkill to install more than the official maximum amount, 768mb.
There are two types of RAM sticks for the 9600: FPM (Fast-Paged Mode) 70ns DIMMs, and EDO (Extended Data Out) 60ns DIMMs. Go for the latter - the 60ns EDO DIMMs, for obvious reasons. Both types of sticks are 5v, 64bit 168pin DIMMs, and the EDO variety is still available from OWC (Other World Computing). The motherboard also supports RAM interleaving which results in a 5%-15% increase in system performance. However you MUST install the sticks in a certain order to take advantage of this:
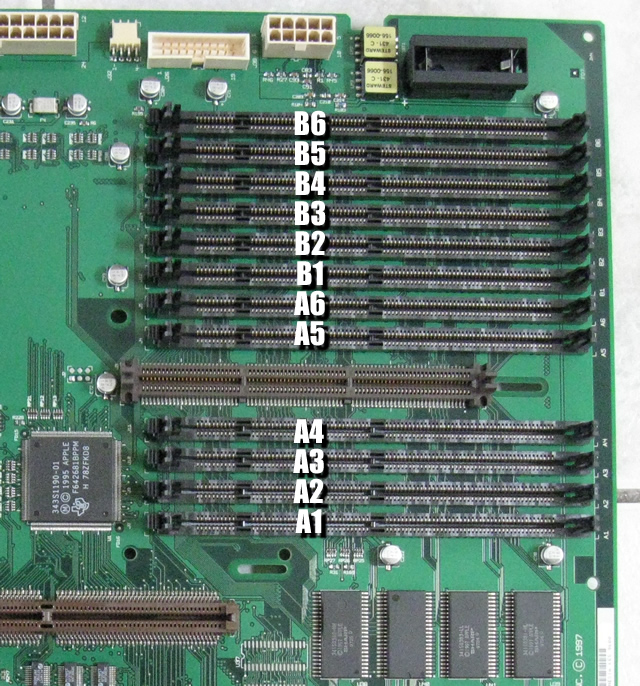
First install a stick into the A6 slot, then into the B6 slot. Then into the A5 slot, then into the B5 slot and so on. When installing you’ll begin to have a gap in between the sticks, which seems kind of weird, but that’s what it takes to get these interleaved correctly. We start with a number first (6 in this case), then we fill up A and B, then move down to the next number (5) and repeat — A then B in a descending way.
You may wonder why we’re starting with the number 6 first rather than the number 1. The truth is that the techs at Apple have contradicted themselves as to what we should start with first. People have more often found success when starting with the higher-numbered slots first, but testing has shown that interleaving was successful in both scenarios. You’ll be fine regardless of your starting point, but I recommend populating A6-B6, then A5-B5 and so on in a descending order since more people have recommended it that way than the other way around.
NOTE:
When booting up, System 7 performs an automatic RAM test and there is no way to disable it like in OS8 or OS9 (by holding Command + Option when opening the Memory control panel). According to my calculations, with 768MB of ram installed, you’ll have to wait approximately 1 minute 25 seconds until you finally see the System 7 screen come on your monitor. Each 128MB stick of RAM adds about 15 seconds of check time to the startup. Here’s what I got when I tested this:
128mb - 0:10
256mb - 0:25
384mb - 0:40
512mb - 0:55
640mb - 1:10
768mb - 1:25
When you turn your system on and you get nothing but a blank screen, don’t worry. It takes time…
The 9600 support up to 768mb of ram officially but it’s possible to install up to 1.5GB in the TWELVE slots that are on your board. Each slot will take up to a maximum of a 128mb stick. As mentioned earlier, these machines are used more for specialty purposes so it’s overkill to install more than the official maximum amount, 768mb.
There are two types of RAM sticks for the 9600: FPM (Fast-Paged Mode) 70ns DIMMs, and EDO (Extended Data Out) 60ns DIMMs. Go for the latter - the 60ns EDO DIMMs, for obvious reasons. Both types of sticks are 5v, 64bit 168pin DIMMs, and the EDO variety is still available from OWC (Other World Computing). The motherboard also supports RAM interleaving which results in a 5%-15% increase in system performance. However you MUST install the sticks in a certain order to take advantage of this:
First install a stick into the A6 slot, then into the B6 slot. Then into the A5 slot, then into the B5 slot and so on. When installing you’ll begin to have a gap in between the sticks, which seems kind of weird, but that’s what it takes to get these interleaved correctly. We start with a number first (6 in this case), then we fill up A and B, then move down to the next number (5) and repeat — A then B in a descending way.
You may wonder why we’re starting with the number 6 first rather than the number 1. The truth is that the techs at Apple have contradicted themselves as to what we should start with first. People have more often found success when starting with the higher-numbered slots first, but testing has shown that interleaving was successful in both scenarios. You’ll be fine regardless of your starting point, but I recommend populating A6-B6, then A5-B5 and so on in a descending order since more people have recommended it that way than the other way around.
NOTE:
When booting up, System 7 performs an automatic RAM test and there is no way to disable it like in OS8 or OS9 (by holding Command + Option when opening the Memory control panel). According to my calculations, with 768MB of ram installed, you’ll have to wait approximately 1 minute 25 seconds until you finally see the System 7 screen come on your monitor. Each 128MB stick of RAM adds about 15 seconds of check time to the startup. Here’s what I got when I tested this:
128mb - 0:10
256mb - 0:25
384mb - 0:40
512mb - 0:55
640mb - 1:10
768mb - 1:25
When you turn your system on and you get nothing but a blank screen, don’t worry. It takes time…
SCSI Hard Drives:
The 9600 has two SCSI busses: the internal ‘Fast’ SCSI-2 bus which rates at 10MB/sec (bus 0 as noted by Apple System Profiler), and the external SCSI-1 bus which rates at 5MB/sec (bus 1 as noted by Apple System Profiler). The Powermac 9600 manual states that the external bus is SCSI-1 (originally known as just ‘SCSI’), yet in tech notes it’s referred to as being SCSI-2 compliant. This is because SCSI-1 is usually compatible with SCSI-2 devices, and that’s the case here, but what the external SCSI-1 bus is NOT compatible with is the Fast mode of SCSI-2. This is why it’s only 5MB/sec, which is half of what proper Fast SCSI-2 can do.
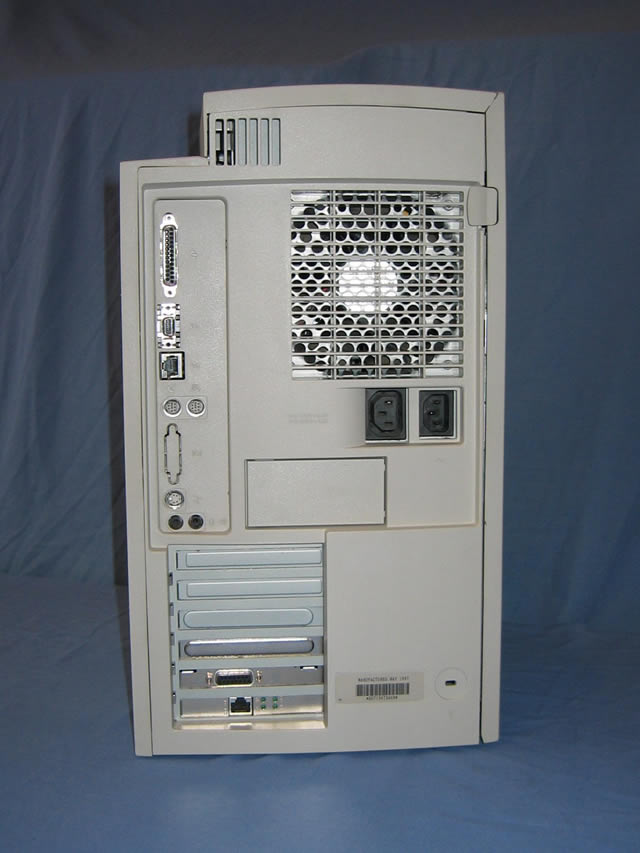
The stock hard drive in the 9600 is an Apple-branded, Fast SCSI (SCSI-2) drive that connects via the internal 50-pin SCSI-2 ribbon cable. The external bus is accessible from the back of the machine via a standard DB25 SCSI cable. The external bus is good for connecting an external SCSI drive for back ups, as well as for running an additional SCSI drive for Pro Tools rigs. You’d also connect your Zip and Jaz drives here, but the 9600 comes stock with a 250MB zip drive on the internal SCSI bus already.
The stock 4GB drive that comes with the 9600 has one of the most annoying high-pitched squeals I’ve ever heard coming from a hard drive. It’s a good idea to replace it. Instead of replacing it with just another standard 50pin SCSI-2 drive though, I opted for a Seagate Cheetah 15k.4 36GB drive. The Cheetah happens to be an Ultra320 SCSI drive which is of a later generation of SCSI technology so that explains why it uses an 80pin SCA connector (Single Connector Attachment).
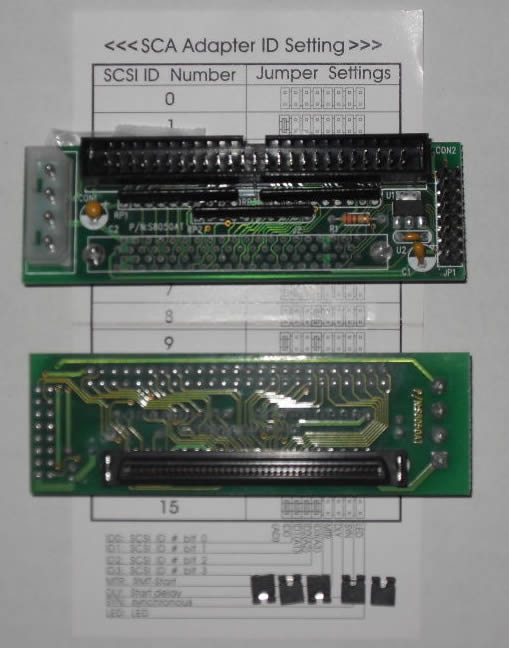
I picked up a cheap 50pin ribbon to 80pin SCA adapter like you see above, connected it to the Cheetah drive, then popped the drive into the 9600, and I thought it wasn’t working at first because I didn’t hear the hard drive spin up. However when I walked into the studio, I saw the hard drive icon appear on the desktop, so that shows you how super quiet these things are.
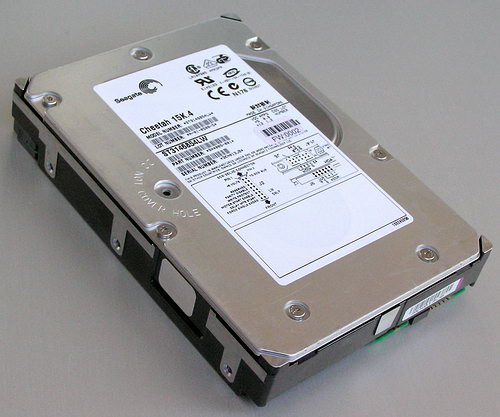
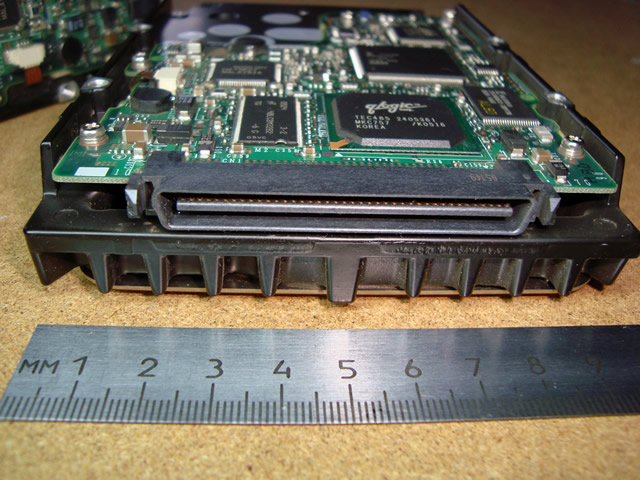
In total I spent about $50 with shipping for the drive and adapter and I couldn’t be happier with it.
NOTE:
Some software doesn't like it when you take out or disconnect the main SCSI drive because the software is expecting the drive to be there. A prime example of this is MOTU's Unisyn. When you install it, it's going to want to put the invisible hard disk authorization onto the SCSI drive. If it's not there, you'll get an error when running the installer. If you install it on the SCSI drive, then disconnect it, obviously, Unisyn won't launch since the authorization is offline. The funny thing is that this doesn't happen at all with non-SCSI Mac machines. I guess MOTU's software senses whether or not a SCSI drive came stock with the system or not. Try to keep a SCSI drive in your 9600 at all times to avoid weird issues like this.
The 9600 has two SCSI busses: the internal ‘Fast’ SCSI-2 bus which rates at 10MB/sec (bus 0 as noted by Apple System Profiler), and the external SCSI-1 bus which rates at 5MB/sec (bus 1 as noted by Apple System Profiler). The Powermac 9600 manual states that the external bus is SCSI-1 (originally known as just ‘SCSI’), yet in tech notes it’s referred to as being SCSI-2 compliant. This is because SCSI-1 is usually compatible with SCSI-2 devices, and that’s the case here, but what the external SCSI-1 bus is NOT compatible with is the Fast mode of SCSI-2. This is why it’s only 5MB/sec, which is half of what proper Fast SCSI-2 can do.
The stock hard drive in the 9600 is an Apple-branded, Fast SCSI (SCSI-2) drive that connects via the internal 50-pin SCSI-2 ribbon cable. The external bus is accessible from the back of the machine via a standard DB25 SCSI cable. The external bus is good for connecting an external SCSI drive for back ups, as well as for running an additional SCSI drive for Pro Tools rigs. You’d also connect your Zip and Jaz drives here, but the 9600 comes stock with a 250MB zip drive on the internal SCSI bus already.
The stock 4GB drive that comes with the 9600 has one of the most annoying high-pitched squeals I’ve ever heard coming from a hard drive. It’s a good idea to replace it. Instead of replacing it with just another standard 50pin SCSI-2 drive though, I opted for a Seagate Cheetah 15k.4 36GB drive. The Cheetah happens to be an Ultra320 SCSI drive which is of a later generation of SCSI technology so that explains why it uses an 80pin SCA connector (Single Connector Attachment).
I picked up a cheap 50pin ribbon to 80pin SCA adapter like you see above, connected it to the Cheetah drive, then popped the drive into the 9600, and I thought it wasn’t working at first because I didn’t hear the hard drive spin up. However when I walked into the studio, I saw the hard drive icon appear on the desktop, so that shows you how super quiet these things are.
In total I spent about $50 with shipping for the drive and adapter and I couldn’t be happier with it.
NOTE:
Some software doesn't like it when you take out or disconnect the main SCSI drive because the software is expecting the drive to be there. A prime example of this is MOTU's Unisyn. When you install it, it's going to want to put the invisible hard disk authorization onto the SCSI drive. If it's not there, you'll get an error when running the installer. If you install it on the SCSI drive, then disconnect it, obviously, Unisyn won't launch since the authorization is offline. The funny thing is that this doesn't happen at all with non-SCSI Mac machines. I guess MOTU's software senses whether or not a SCSI drive came stock with the system or not. Try to keep a SCSI drive in your 9600 at all times to avoid weird issues like this.
SATA/IDE Hard Drives:
This one is simple. Buy a PCI SATA or IDE controller and have at it. Your SATA controller will show up as a SCSI controller in the System Profiler as SCSI Bus 2. Some SATA/IDE controllers allow you to boot off of the drive while others only allow you to use drives as file storage. I personally run my main OS on the SCSI Cheetah drive to ensure compatibility, and I also use a Sonnet Tempo SATA PCI card for a fast SSD. The SSD has two partitions: one formatted to Mac OS Standard which is my universal backup drive, and another formatted to Mac OS Extended which I’ve titled Pro Tools Drive. The latter volume's name gives away what it’s used for.
Since the 9600's internal SCSI bus is rated at 10MB/sec, plus since not all SCSI drives can get close to that speed, an additional HD on the external SCSI bus may be needed in order to have all of your Pro Tools tracks playing back without dropouts. It’s been recommended in the past to not simultaneously boot off of, run Pro Tools on, and record to/read from your main system drive. Digidesign has always recommended using a separate drive for that (it can be on the internal bus, no problem), but I use just my SSD for all of my Pro Tools audio files and it works fine.
NOTE:
If you’re using an IDE or SATA controller and you’re booting off of the drive connected to it, you’ll most likely encounter a message every single time you boot up saying that the Mac was improperly shut down. Even if it’s not true, you’ll still get the message. Nothing is wrong, it’s just how the 9600 reacts because it doesn’t like SATA controllers for some reason. You can turn this message off in one of the control panels so you won’t have to click OK every time you boot up.
This one is simple. Buy a PCI SATA or IDE controller and have at it. Your SATA controller will show up as a SCSI controller in the System Profiler as SCSI Bus 2. Some SATA/IDE controllers allow you to boot off of the drive while others only allow you to use drives as file storage. I personally run my main OS on the SCSI Cheetah drive to ensure compatibility, and I also use a Sonnet Tempo SATA PCI card for a fast SSD. The SSD has two partitions: one formatted to Mac OS Standard which is my universal backup drive, and another formatted to Mac OS Extended which I’ve titled Pro Tools Drive. The latter volume's name gives away what it’s used for.
Since the 9600's internal SCSI bus is rated at 10MB/sec, plus since not all SCSI drives can get close to that speed, an additional HD on the external SCSI bus may be needed in order to have all of your Pro Tools tracks playing back without dropouts. It’s been recommended in the past to not simultaneously boot off of, run Pro Tools on, and record to/read from your main system drive. Digidesign has always recommended using a separate drive for that (it can be on the internal bus, no problem), but I use just my SSD for all of my Pro Tools audio files and it works fine.
NOTE:
If you’re using an IDE or SATA controller and you’re booting off of the drive connected to it, you’ll most likely encounter a message every single time you boot up saying that the Mac was improperly shut down. Even if it’s not true, you’ll still get the message. Nothing is wrong, it’s just how the 9600 reacts because it doesn’t like SATA controllers for some reason. You can turn this message off in one of the control panels so you won’t have to click OK every time you boot up.
Video Cards:
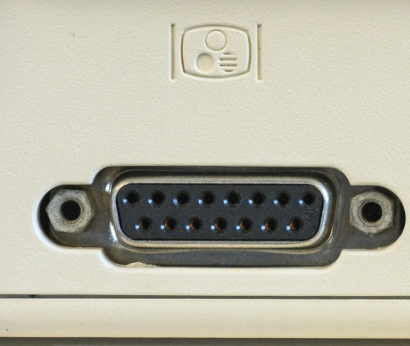
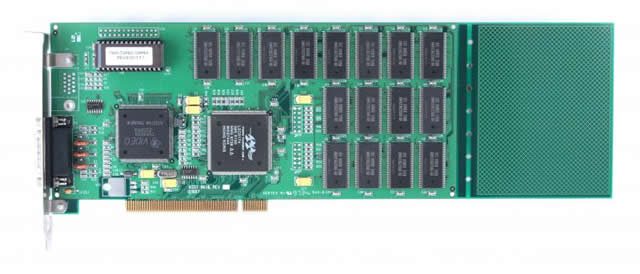
There aren’t many 3rd party video cards for the 9600. The ATI Radeon 9200 is the most powerful one you can get for a 9600, but the Radeon 7000 series cards also work well. The card that the 9600 ships with is the 8MB ixMicro TwinTurbo card that uses the oldschool Apple Monitor Interface DB15 connector:
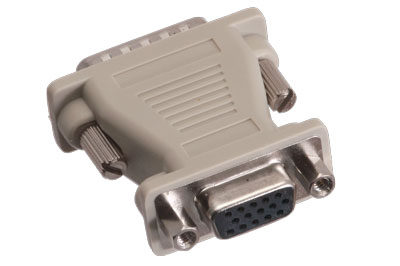
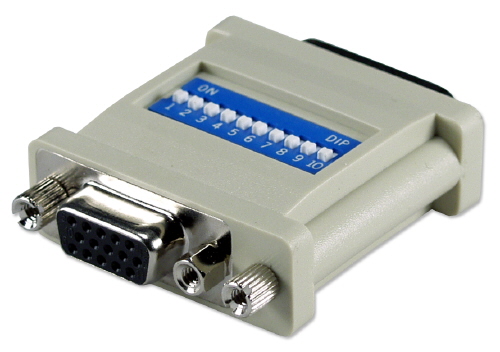
You won’t be fooling with any DVI stuff on a 9600, at least with the stock 9600 card. Seeing that I’ve got two 1080p widescreen DVI/VGA monitors, I needed a couple Apple DB15 to VGA adapters. I got mine from a random online store and they work fine, but be aware that some are higher quality than others, and that some also include jumpers on them while others don’t. Mine didn’t happen to have jumpers on them, so take a look at the manufacturer’s provided documentation to make sure you have the jumpers set right. Otherwise, you’ll either lose quality, or you’ll lose color in your video.
The ixMicro TwinTurbo cards are pretty underpowered. They give you a bunch of different 4:3 display aspect ratio resolutions, with the highest one being 1600X1200. Unfortunately no 16:9 widescreen DAR resolution is provided. It just wasn’t around back then. I’m unsure if the Radeon cards provide any 16:9 DARs or not, or which kind of connectors they use, but if they do provide any 16:9 DARs, you'd be better off using those instead of the stock ixMicro TwinTurbo cards.
There IS in fact a way to get the Twin Turbo cards rocking some 16:9 flavor in your monitors, but it can’t be done without some serious hacks. The way I got mine running at 16:9 DARs was by paying someone to hack them for me. This involved having to physically mail the cards to the hacker. The problem with distributing my own personal hacked drivers is that they’re completely custom, and they’re coded precisely for my own needs and my own hardware. The Twin Turbo cards have different models, different revisions, different EPROMs, and possibly different stock drivers, so consequently there’s different code to fool with too. If you add on top the fact that I’m running at a slightly abnormal 1280X720 resolution, I think you can see that it most likely wouldn’t be compatible with your personal 9600 rig.
It’s best to use a Radeon to get where you’re going.
There aren’t many 3rd party video cards for the 9600. The ATI Radeon 9200 is the most powerful one you can get for a 9600, but the Radeon 7000 series cards also work well. The card that the 9600 ships with is the 8MB ixMicro TwinTurbo card that uses the oldschool Apple Monitor Interface DB15 connector:
You won’t be fooling with any DVI stuff on a 9600, at least with the stock 9600 card. Seeing that I’ve got two 1080p widescreen DVI/VGA monitors, I needed a couple Apple DB15 to VGA adapters. I got mine from a random online store and they work fine, but be aware that some are higher quality than others, and that some also include jumpers on them while others don’t. Mine didn’t happen to have jumpers on them, so take a look at the manufacturer’s provided documentation to make sure you have the jumpers set right. Otherwise, you’ll either lose quality, or you’ll lose color in your video.
The ixMicro TwinTurbo cards are pretty underpowered. They give you a bunch of different 4:3 display aspect ratio resolutions, with the highest one being 1600X1200. Unfortunately no 16:9 widescreen DAR resolution is provided. It just wasn’t around back then. I’m unsure if the Radeon cards provide any 16:9 DARs or not, or which kind of connectors they use, but if they do provide any 16:9 DARs, you'd be better off using those instead of the stock ixMicro TwinTurbo cards.
There IS in fact a way to get the Twin Turbo cards rocking some 16:9 flavor in your monitors, but it can’t be done without some serious hacks. The way I got mine running at 16:9 DARs was by paying someone to hack them for me. This involved having to physically mail the cards to the hacker. The problem with distributing my own personal hacked drivers is that they’re completely custom, and they’re coded precisely for my own needs and my own hardware. The Twin Turbo cards have different models, different revisions, different EPROMs, and possibly different stock drivers, so consequently there’s different code to fool with too. If you add on top the fact that I’m running at a slightly abnormal 1280X720 resolution, I think you can see that it most likely wouldn’t be compatible with your personal 9600 rig.
It’s best to use a Radeon to get where you’re going.
Serial Ports:
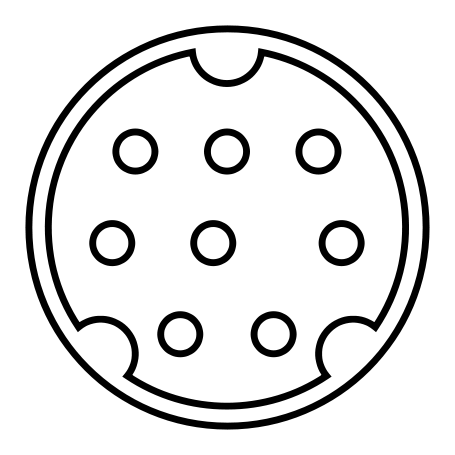
The 9600 has two built-in serial ports: the modem port and the printer port. With these you’ll be able to get the Mac Daddy of midi interfaces, the almighty Opcode Studio 5LX. You absolutely WILL NOT get better midi timing with any USB G3/G4 or any USB interface in general. I’m not knocking USB here necessarily — there have been many talks about the speed of midi over USB as compared to the serial protocol, it’s just that the Studio 5LX itself has some wicked speed optimization programming going on on the inside of it, and it just so happens to use serial ports. The Opcode guys really knew what they were doing, and the Studio 5LX proves it.
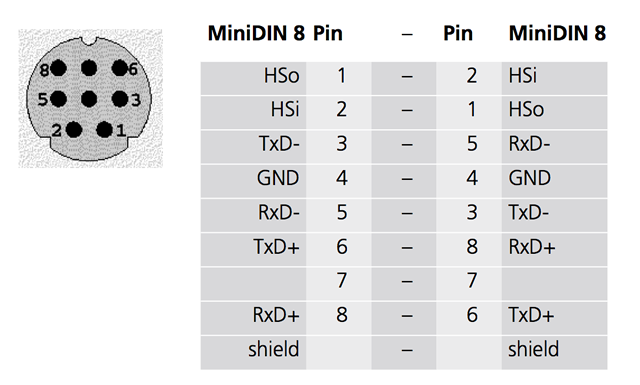
Serial cables and serial devices use different pinouts for various reasons, so it’s of utmost importance that you choose the correct cables for your serial MIDI interfaces. A lot of the cables on Ebay and online computer hardware stores offer the same 8-pin mini-DIN serial cables as the ones that you want, but the wiring or pinout most likely won’t be correct. Usually you’ll come across straight-through instead of the ‘crossover’ pinout variety that we need. Straight-through is pin 1 to 1, pin 2 to 2 and so on. The correct crossover pinout is in the picture below:
Like with ADB cables, you’re going to find that serial cables are usually too short. To solve this problem, I bought a quantity of six serial cables with the correct pinout (in case I get some future 9600s), plus some serial extension cables, plus some standard, longer serial cables. There is a catch here, however.
The proper crossover pinout serial cables I got were about 5 feet in length, and the other cables I got were rather long (10’ extenders and 15’ standard serial cables). The catch is that both the extender cables, AND the standard cables both have a straight-through pinout. I know I said to not use these, but the reason this works is that if you have at least ONE crossover pinout cable in the chain somewhere, the wiring/pinout is corrected at that point. That means you’re free to run straight-through from there on out (since the wiring has already been corrected at another point in the chain).
It doesn’t matter if you plug the crossover cable into your midi interface, or if you plug it into the 9600. As long as it’s corrected once at least somewhere in the chain, you’re good. I was unable to locate long crossover pinout cables, and I was also unable to locate crossover pinout extension cables so it left me with doing what I said above. In case you do find crossover pinout extension cables someday, make sure to not use two crossover pinout cables in one chain as that would actually reverse the wiring that you tried to correct in the first place.
The 9600 has two built-in serial ports: the modem port and the printer port. With these you’ll be able to get the Mac Daddy of midi interfaces, the almighty Opcode Studio 5LX. You absolutely WILL NOT get better midi timing with any USB G3/G4 or any USB interface in general. I’m not knocking USB here necessarily — there have been many talks about the speed of midi over USB as compared to the serial protocol, it’s just that the Studio 5LX itself has some wicked speed optimization programming going on on the inside of it, and it just so happens to use serial ports. The Opcode guys really knew what they were doing, and the Studio 5LX proves it.
Serial cables and serial devices use different pinouts for various reasons, so it’s of utmost importance that you choose the correct cables for your serial MIDI interfaces. A lot of the cables on Ebay and online computer hardware stores offer the same 8-pin mini-DIN serial cables as the ones that you want, but the wiring or pinout most likely won’t be correct. Usually you’ll come across straight-through instead of the ‘crossover’ pinout variety that we need. Straight-through is pin 1 to 1, pin 2 to 2 and so on. The correct crossover pinout is in the picture below:
Like with ADB cables, you’re going to find that serial cables are usually too short. To solve this problem, I bought a quantity of six serial cables with the correct pinout (in case I get some future 9600s), plus some serial extension cables, plus some standard, longer serial cables. There is a catch here, however.
The proper crossover pinout serial cables I got were about 5 feet in length, and the other cables I got were rather long (10’ extenders and 15’ standard serial cables). The catch is that both the extender cables, AND the standard cables both have a straight-through pinout. I know I said to not use these, but the reason this works is that if you have at least ONE crossover pinout cable in the chain somewhere, the wiring/pinout is corrected at that point. That means you’re free to run straight-through from there on out (since the wiring has already been corrected at another point in the chain).
It doesn’t matter if you plug the crossover cable into your midi interface, or if you plug it into the 9600. As long as it’s corrected once at least somewhere in the chain, you’re good. I was unable to locate long crossover pinout cables, and I was also unable to locate crossover pinout extension cables so it left me with doing what I said above. In case you do find crossover pinout extension cables someday, make sure to not use two crossover pinout cables in one chain as that would actually reverse the wiring that you tried to correct in the first place.
Absolutely Awesome 
wow great post 