

Thread
Macintosh Plus Internal Hard Drive *Mod*
http://www.jagshouse.com/plusinternal.html
I've been looking around and have not found much,
Here is what i would like to accomplish:
Install a Pie fan, Aiming upwards, for extra ventilation,
Install a 40mb Quantom SCSI hd,
I plan to create my own power for the Fan and Hard drive
at microcetner they have a USB to 2.5IDE,3.5IDE,SATA adaptor they are 12 bucks
and come with a Power supply that has both Molex and SATA Power connections,
i've already done this hack to my Macintosh Classic, because i am to lazy to replace the analogue board,
the analogue board was not making enough power to spin up the hd, so i added my own,
Soldered the 120vac wires right to the Macintosh Power switch, so it comes on when the switch is ON
and because its all internalized its clean and you would never know.
The only additional thoughts with this project and the Macintosh Plus Hard drive mod is:
1) Fan Mounting Where?
2) 3.5" Hard Drive Mounting
3) Power Brick Placement
4) How to get a SCSI connection from the External Port to the Internal Hard Drive.
Any information / ideas / pictures you share would be much appreciated!! Thank You!
I am only pursuing this because i know the Macintosh Plus is Widely available.
And i must admit i love the Clean look of the front of it, Both Beige and Platinum!
I've been looking around and have not found much,
Here is what i would like to accomplish:
Install a Pie fan, Aiming upwards, for extra ventilation,
Install a 40mb Quantom SCSI hd,
I plan to create my own power for the Fan and Hard drive
at microcetner they have a USB to 2.5IDE,3.5IDE,SATA adaptor they are 12 bucks
and come with a Power supply that has both Molex and SATA Power connections,
i've already done this hack to my Macintosh Classic, because i am to lazy to replace the analogue board,
the analogue board was not making enough power to spin up the hd, so i added my own,
Soldered the 120vac wires right to the Macintosh Power switch, so it comes on when the switch is ON
and because its all internalized its clean and you would never know.
The only additional thoughts with this project and the Macintosh Plus Hard drive mod is:
1) Fan Mounting Where?
2) 3.5" Hard Drive Mounting
3) Power Brick Placement
4) How to get a SCSI connection from the External Port to the Internal Hard Drive.
Any information / ideas / pictures you share would be much appreciated!! Thank You!
I am only pursuing this because i know the Macintosh Plus is Widely available.
And i must admit i love the Clean look of the front of it, Both Beige and Platinum!
Is it worth all the trouble when you can just sit it on an external SCSI drive?
oh yeah, i mean i totally know what you are saying!
I feel its worth it for a couple reasons:
- Internal HD can mean less clutter
I will use it more because, I can grab it off my shelf flip it on and be ready to go,
- The plus needs a internal Fan anyways,
- Once i use it more i will enjoy the minimalist look of it more.
- And because there is very few out there, i will like it more because its custom!
- And the project sounds fun.
basically what i really need is to figure out how to attach a scsi cable to the onboard external SCSI header,
i guess i would need a pinout of the scsi port, and a scsi cable,
i'm guessing that i would use an exacto knife, and cut the cable, strip wires and solder the wires right to the header, or at-least only the wires i need. the scsi drive has termination, just not sure what will happen if i hook up my scsi zip drive,,, i would assume that would have to be terminated.
I feel its worth it for a couple reasons:
- Internal HD can mean less clutter
I will use it more because, I can grab it off my shelf flip it on and be ready to go,
- The plus needs a internal Fan anyways,
- Once i use it more i will enjoy the minimalist look of it more.
- And because there is very few out there, i will like it more because its custom!
- And the project sounds fun.
basically what i really need is to figure out how to attach a scsi cable to the onboard external SCSI header,
i guess i would need a pinout of the scsi port, and a scsi cable,
i'm guessing that i would use an exacto knife, and cut the cable, strip wires and solder the wires right to the header, or at-least only the wires i need. the scsi drive has termination, just not sure what will happen if i hook up my scsi zip drive,,, i would assume that would have to be terminated.
Back pack hard disk drive?
The hardiest part for me is going to be soldering those internal scsi cable wires to the external scsi header,
I know it would be a sin to hack the back up, so maybe you can somehow sneak a SCSI cable from the internal drive out the back and into the SCSI connector. Maybe somehow sneak the cable out the security lock hole thing. You might have to come up with some sort of homebrew cable.
i guess i have to look more at the header, was hoping to conceal all cabling/mod to the inside, so nothing is visible.
so that means solder directly to the main-board or back of the header form the inside.
so that means solder directly to the main-board or back of the header form the inside.
Here's a possibility to consider. Get yourself a low-profile 40-pin header, solder it directly to the NCR5380 SCSI chip. Then take a SCSI ribbon cable with connector on one end and solder the wires on the other end to the header. I did this 25 years ago, so I no longer remember if I had to use a Dremel to cut out some metal from the chassis to make room, but I do remember being prepared to use it.
Once you've made an internal SCSI connector this way, you're most of the way there. You just have to figure out how to mount all the bits (the cage around the floppy drive offers several possibilities). As far as the fan is concerned, having it move air over the already underventilated analog board power supply bits is my recommendation, so however you mount a fan, aim it that way.
If you do go this route, please document your procedure with pics. I'm sure others would be very interested!
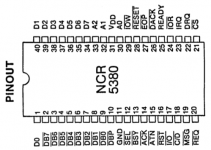
For pinouts, do a google search for "NCR 5380 SCSI chip" and you'll find links to the original manuals.
Good luck!
Once you've made an internal SCSI connector this way, you're most of the way there. You just have to figure out how to mount all the bits (the cage around the floppy drive offers several possibilities). As far as the fan is concerned, having it move air over the already underventilated analog board power supply bits is my recommendation, so however you mount a fan, aim it that way.
If you do go this route, please document your procedure with pics. I'm sure others would be very interested!
For pinouts, do a google search for "NCR 5380 SCSI chip" and you'll find links to the original manuals.
Good luck!
do NOT buy the power supply from microcenter! I went through 2 of those already, those chinese peice of shit garbage power supplies like to blow up, one of them took the hard drive with it! What you want, is a quality 5v/12v brick that comes with external drive enclosures (older one, not newer one). They have 4-pin DINs on the end.
Then modify the end DIN to support molex.
Then modify the end DIN to support molex.
ok gotcha, i think i have one of those laying around some where.
thanks for the info, i agree i will post items in this thread as i go,
i am going to take the plus apart tonight. this plus was an upgraded 128K so i should keep it going
and mod it some more
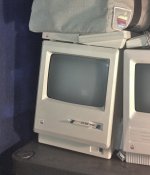
thanks for the info, i agree i will post items in this thread as i go,
i am going to take the plus apart tonight. this plus was an upgraded 128K so i should keep it going
and mod it some more
Recently, trag posted about some 2.5" Ultra Somethingorothers that are backwards compatible in another thread.
One of those will take up less room, probably use less power, generate less heat and maybe even add less noise than any Mac ROM'd 3.5" SCSI HDD from decades ago. They're fairly large capacity, but I'm pretty sure they won't work in PowerBooks, they're 15mm tall and ISTR something on the order of a 14mm max. height for the PBs . . . whatever, the adapter needed to use them would likely make them too long anyway.
That they're working pulls of far more recent manufacture is a huge plus as well, BTW.
One of those will take up less room, probably use less power, generate less heat and maybe even add less noise than any Mac ROM'd 3.5" SCSI HDD from decades ago. They're fairly large capacity, but I'm pretty sure they won't work in PowerBooks, they're 15mm tall and ISTR something on the order of a 14mm max. height for the PBs . . . whatever, the adapter needed to use them would likely make them too long anyway.
That they're working pulls of far more recent manufacture is a huge plus as well, BTW.
ok taking a closer look at the main board, it looks like i can solder the scsi cable right to the rear side of the NCR 5380/SCSI Chip,
it looks to me like the external scsi connector's traces all lead to one side of the chip(Rear).
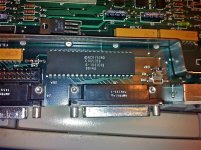
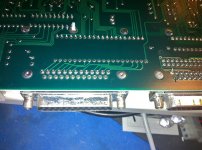
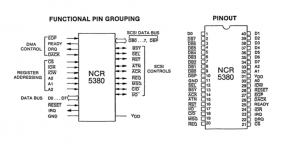
it looks to me like the external scsi connector's traces all lead to one side of the chip(Rear).
If I were doing it, I would take TomLee's advice, and solder a couple of header strips to the pins of the 53C80. Then I would take a 40 pin socket and plug it into the header strips. Solder the wires for your ribbon cable to the upturned pins of the 40 pin socket.
Then, if you want to remove the modification, all you must do is pull the socket off of the header strips. The strips will still be there, but they're very unobtrusive.
This is the method which was used back in the day to connect upgrade boards to the 68000 processor in the Plus and earlier.
Also, while you're soldering the header strips to the 53C80, if you insert the strips into the socket first, the socket will give you proper spacing and keep the strips parallel to each other and perpendicular to the board.
Looks like you already found it, but in case someone else needs it, datasheet for 53C80:
http://www.prismnet.com/~trag/DataSheet/Z53C80.pdf
and, incidentally, 53C96 and 53CF96 respectively:
http://www.prismnet.com/~trag/DataSheet/AM53C94_AM53C96.pdf
http://www.prismnet.com/~trag/DataSheet/AM53CF94_AM53CF96.pdf
Then, if you want to remove the modification, all you must do is pull the socket off of the header strips. The strips will still be there, but they're very unobtrusive.
This is the method which was used back in the day to connect upgrade boards to the 68000 processor in the Plus and earlier.
Also, while you're soldering the header strips to the 53C80, if you insert the strips into the socket first, the socket will give you proper spacing and keep the strips parallel to each other and perpendicular to the board.
Looks like you already found it, but in case someone else needs it, datasheet for 53C80:
http://www.prismnet.com/~trag/DataSheet/Z53C80.pdf
and, incidentally, 53C96 and 53CF96 respectively:
http://www.prismnet.com/~trag/DataSheet/AM53C94_AM53C96.pdf
http://www.prismnet.com/~trag/DataSheet/AM53CF94_AM53CF96.pdf
here is a pinout for the DB-25 scsi
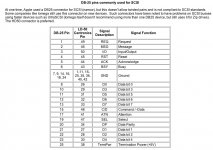
Don't forget, it you connect your hdd directly to the chip, plugging in anything to the actual SCSI port will probably screw up your termination.
hey trag , i'm sorry , for some reason i am having a hard time trying to visualize this header,
what i was going to do is carefully strip a scsi cable and solder wires right to the chip,
your idea sounds better, little more work, but better.
can you post a picture showing this?
Thank you!
what i was going to do is carefully strip a scsi cable and solder wires right to the chip,
your idea sounds better, little more work, but better.
can you post a picture showing this?
Thank you!
Internal drive headers are usually located between the SCSI chip and the external port.
The internal drive will require termination, as will the external device chain, as I understand it. NoPro for the chain for the hack in that case.
The internal drive will require termination, as will the external device chain, as I understand it. NoPro for the chain for the hack in that case.
I was wondering about the termination, its always last device on the chain(terminated), so i am thinking because technically i am leaving the external scsi port intact, lets say i have the hard drive soldered to the chip, and its terminated, and i plug in my external zip drive, that would also need to be terminated as well.
if i am thinking about this corectlly….
if i am thinking about this corectlly….
ok the hard drive will slide under the floppy drive i just need to drill some holes in the cage so i can mount the hard drive to it.
i was going to mount the fan toward the lower section sucking cold air in to the machine , that way i'm not fighting convection.
i am going to run the fans at 5v instead of 12 v,,,, at 5v they are almost silent.
i was going to mount the fan toward the lower section sucking cold air in to the machine , that way i'm not fighting convection.
i am going to run the fans at 5v instead of 12 v,,,, at 5v they are almost silent.
Nice blog post on adding internal SCSI to a Plus: http://www.artmix.com/wordpress/?p=185 :b&w:
Interesting to see he is using a SCSI / IDE adapter that looks like it's not his own design.
Interesting to see he is using a SCSI / IDE adapter that looks like it's not his own design.
IIRC, there was a picture of a baffle for the chassis of the Plus posted here. It came with the Radius 16 and re-directed airflow over the A/B as the MIA Twiggy Drive Cover Box was apparently meant to do in the original design. re-creating the baffle effect and using a fan to air u[p that slot and across the A/B there would be the ultimate cooling hack . . .
. . . IIRC. :?:
. . . IIRC. :?:
I would like to get ahold of that document he has there…
(English Readable)
http://translate.google.com/translate?hl=en&ie=UTF8&prev=_m&sl=auto&tl=en&twu=1&u=http://www.artmix.com/wordpress/%3Fp%3D185
incase the blog goes down.
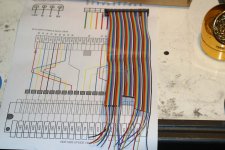
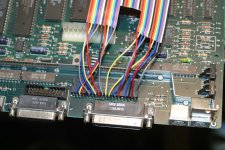
(English Readable)
http://translate.google.com/translate?hl=en&ie=UTF8&prev=_m&sl=auto&tl=en&twu=1&u=http://www.artmix.com/wordpress/%3Fp%3D185
incase the blog goes down.
Maybe post a comment or send him an email, and he might be willing to post it. Most of the info is there in the two photos (the one with the tool over the page also), but having a printout while doing the work would be helpful.
The rainbow ribbon cable really helps with this kind of job.
The rainbow ribbon cable really helps with this kind of job.
ok thanks TT
does anyone else want to do this mod as well ?
i am going to start soldering tonight.
i don't have a multicolored scsi cable… but i think i can visually figure this out.
does anyone else want to do this mod as well ?
i am going to start soldering tonight.
i don't have a multicolored scsi cable… but i think i can visually figure this out.
I'll add my two bits in on the ways to go about this hack.
Stop by a CrapShack on the way home and buy a header strip to solder to the chips legs, it's not only more elegant to hack the cable at the IDC connector instead of the way it's done in the picture, it's a far more robust connection besides the reasons delineated above.
free advice:
ALWAYS take tomlee59's advice . . .
. . . take trag just as seriously . . .
. . . it's pretty well known around here that I have no aversion whatsoever to nasty, ugly, ill-advised hackery.
Buy the header strip. [}] ]'>
Stop by a CrapShack on the way home and buy a header strip to solder to the chips legs, it's not only more elegant to hack the cable at the IDC connector instead of the way it's done in the picture, it's a far more robust connection besides the reasons delineated above.
free advice:
ALWAYS take tomlee59's advice . . .
. . . take trag just as seriously . . .
. . . it's pretty well known around here that I have no aversion whatsoever to nasty, ugly, ill-advised hackery.
Buy the header strip. [}
] ]'>
Yes, i agree with everyone else. You need to buy a row of male header pins and solder them streight to the chip.
I posted the picture of the headers just in case your not sure what headers we are all talking about.
Solder that strip right to the chips legs. Then you can fabricate your cable and solder to the female header. I also posted that picture too.
This way, the thing can be unplugged.
If you want to put the female headers on the chip and male on the SCSI cable, thats fine too and i actually recommend that over the other method, so if the mod is reversed, your connector wont short to the chassis.
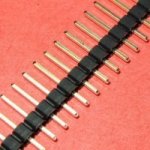
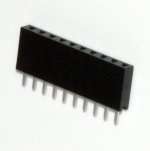
I posted the picture of the headers just in case your not sure what headers we are all talking about.
Solder that strip right to the chips legs. Then you can fabricate your cable and solder to the female header. I also posted that picture too.
This way, the thing can be unplugged.
If you want to put the female headers on the chip and male on the SCSI cable, thats fine too and i actually recommend that over the other method, so if the mod is reversed, your connector wont short to the chassis.
If a soldered header on top of the chip clears the chassis when sliding out the logic board, it sounds like a good idea. Is there clearance? Either way soldering directly to the chip is pretty hack-ish, but hard to get around.
i can solder the header tips then bend it over (facing the front of the computer) then it should be aiming in the right direction where it will not get hung up on anything.
literally the female part will be laying on the top of the scsi chip.
literally the female part will be laying on the top of the scsi chip.
They sell 90-deg headers so you dont have to do that.
and again i can get this stuff at radioshack?